![]() You can download the StrongVPN Windows software from the setup page of their website by selecting “Setup” from the site main menu. Then click on the “StrongVPN for Windows” button. This will bring up a dialog window that will let you save the Windows client installation file to your computer. The client requires Windows XP or above. The client setup page also has manual setup guides to configure Windows XP, Windows Vista, Windows 7, Windows 8, and Windows 10 to use their service with OpenVPN, IPSec, SSTP, L2TP, and PPTP.
You can download the StrongVPN Windows software from the setup page of their website by selecting “Setup” from the site main menu. Then click on the “StrongVPN for Windows” button. This will bring up a dialog window that will let you save the Windows client installation file to your computer. The client requires Windows XP or above. The client setup page also has manual setup guides to configure Windows XP, Windows Vista, Windows 7, Windows 8, and Windows 10 to use their service with OpenVPN, IPSec, SSTP, L2TP, and PPTP.
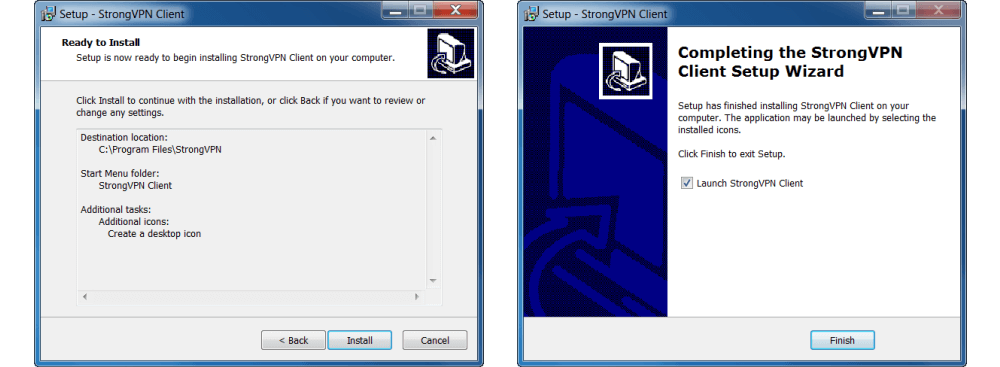
![]() Once the client is downloaded to your computer, right-click on the file and choose “Run as Administrator”. The setup will first have you choose your language and accept the StrongVPN TOS. You will then need to choose a destination location, start menu folder, and check to create a desktop icon. This will result in an install window like the one below-left. Clicking the “Install” button will start the installation which will finish by creating a desktop icon like the one shown on the right. After this completes, you will be prompted to install the TAP driver. After the TAP driver is installed, you will see a screen like the one shown below-right. Click on the “Finish” button to launch the StrongVPN client for the first time.
Once the client is downloaded to your computer, right-click on the file and choose “Run as Administrator”. The setup will first have you choose your language and accept the StrongVPN TOS. You will then need to choose a destination location, start menu folder, and check to create a desktop icon. This will result in an install window like the one below-left. Clicking the “Install” button will start the installation which will finish by creating a desktop icon like the one shown on the right. After this completes, you will be prompted to install the TAP driver. After the TAP driver is installed, you will see a screen like the one shown below-right. Click on the “Finish” button to launch the StrongVPN client for the first time.
The first time you open the client, you will see a verification and login page similar to the one shown on the left below. There are options to create an account or reset your password if you have forgotten it. It you have the information from your welcoming email, enter in your “Email” and “Password” from it. These have been entered and redacted from the image on the right below.
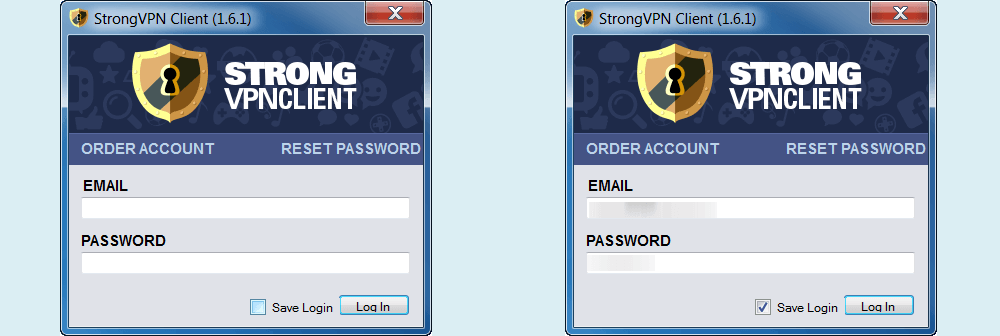
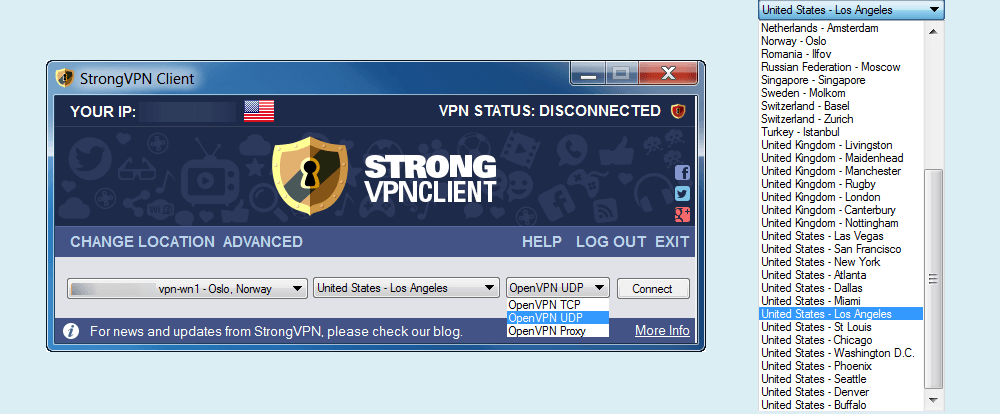
Once you have entered your credentials, check “Save Login” so that the client will remember your login information and you will not have to reenter it. Next, click on the “Log In” button. This will bring up the main client connection screen as is shown below-left. This screen shows the following:
- Your current IP address which we have redacted.
- VPN Status: Disconnected followed by a red StrongVPN logo
- The StrongVPN Client Logo
- Options Menu
- Change Location – This allows you to manually choose an individual server to connect to which we discuss later in this review.
- Advanced – The advanced options available to those who want greater control over their VPN connections which we will also discuss later.
- Help – This will take you to the StrongVPN website support page.
- Log Out – This will log you out of the client and minimize it to the tray. it will not close the client. If you log out, you will have to re-enter you “email” and “password” when you connect to another location. This could be useful if you are using a shared computer.
- Exit – This will close out the StrongVPN Windows client.
- Your last connected location – In this case Oslo, Norway.
- Your currently chosen location to connect to which was selected from the drop down list as we have shown exploded on the right in the image below.
- The protocol that will be used for the connection
- OpenVPN TCP – This is the OpenVPN Transport Control Protocol and includes error detection and correction for dropped packets and packet order. Because of this it can be a little slower, but it can also be more reliable in rural areas or over long distances.
- OpenVPN UDP – This is the OpenVPN User Datagram Protocol and does not include the overhead of TCP and thus is faster and is the StrongVPN client default.
- OpenVPN Proxy – This is useful to hide your IP address and will let you choose which applications run through the VPN.
- The “Connect ” button which will connect you to your chosen VPN server.
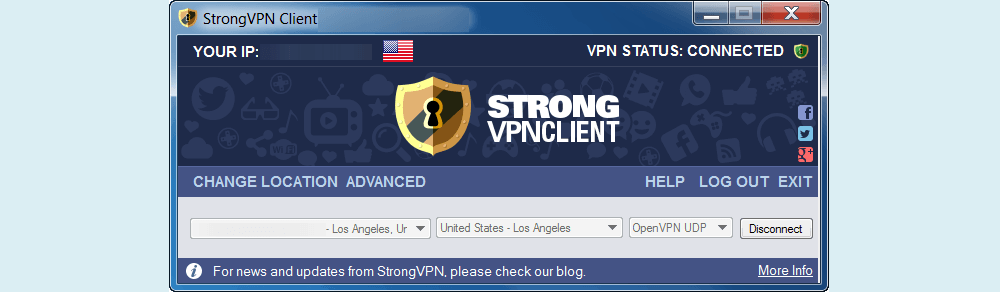
The last component of the screen is the “More Info” link which will take you to the StrongVPN blog. Now that we have examined the components of the main connection screen, click on the “Connect” button to complete your connection to the Los Angeles location. This will bring up a screen like the one shown below. Notice the following changes between the connected screen and the disconnected one:
- Your home IP address has been replaced with a virtual one from The LA VPN server which has been redacted from the image.
- VPN Status: is now “Connected” and the StrongVPN icon is now green.
- The previous connection has been replaced with your current one in Los Angeles.
- The “Connect” button has now been replaced by the “Disconnect” button.
As you can see if you accept the defaults offered by the client, then connecting to the StrongVPN network takes just a few clicks of the mouse and requires no special technical knowledge. By default, it will connect you to the fastest server in your chosen city from your current location. Now let us take a look at how you change locations in the StrongVPN client. In order to change locations, you must first disconnect from the network. The image below shows the system tray messages that indicate that you are first connected to the LA server and then disconnected. Note the icon changes from the connected color (green) to the disconnected one (red).

For those of you who want more control over your VPN connection, StrongVPN has a “Change Location” menu item which will let you change your protocol as well as your location. When you click on the “Change Location” menu item you will see a screen like the one shown below.
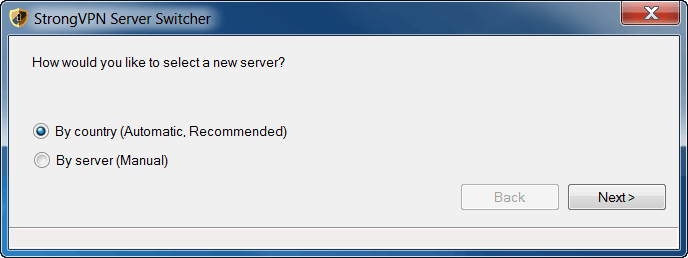 This screen has two options on it: “By country” and “By server”. These two selections are illustrated in the image below. The first shows the selection by country and the second by server.
The first screenshot below illustrates how, by country, the recommended option works. First, choose a country from the dropdown list. Next choose a protocol type. PPTP was chosen in the example below. You must then click on the “Test All Servers” button and wait. Be aware, it can take up to 20 minutes for this test to complete depending on the number of VPN servers it checks for a particular country. Once this completes the best server will be shown just under the “Test All Servers” button. We have redacted the server names from this review. You would then click the “Next” button to start the server switch.
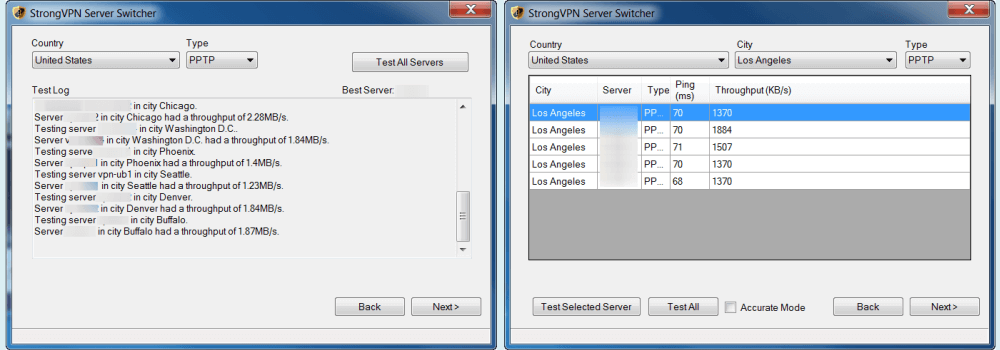
The second image above shows a sample of the by server selection. First you will need to select a country and a city from their respective dropdown lists. Next, choose a protocol type. PPTP was chosen in this example. You can then choose to test a particular server or all of the servers by clicking either the “Test Selected Server” button or the “Test All” button. You can then sort the results by ping time (ms) and throughput (KB/s). Examining the above example, you might want to choose the second server which has a slightly higher ping time but much better throughput than the other servers. Once you highlight your server choice, click on the “Next” button to show the switch screen.
The switch screen which is shown below-left is the same regardless of which method you choose to change VPN servers. Click the “Switch” button on this screen to initiate the server switch procedure and change to your chosen server. This procedure is illustrated in the image below right. The server names have been redacted. The last image says “Changing account ###### from server1 to server2 as an example prototype.

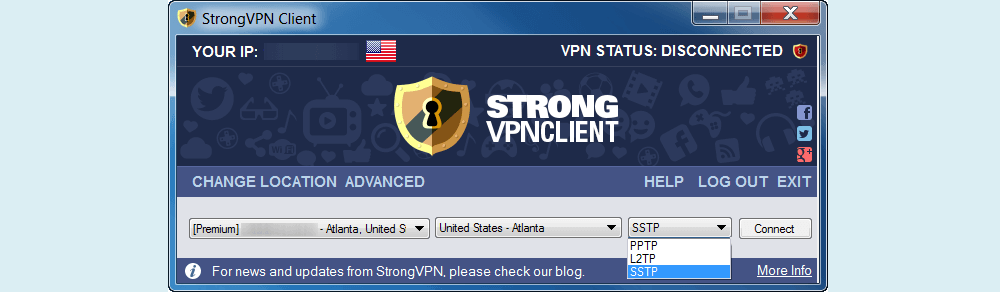
Once the account server change process has completed, you will see a message telling you that the server change was successful and then the main client connection screen will be shown as below. The server automatically chosen using the by country selection is now shown as the server you will connect to when you click on the “Connect” button. By default the client will connect using the SSTP protocol, but you can change it to PPTP or L2TP if you want by using the drop down list as is shown below. Once you have settled on the protocol you want to use, then click on the “Connect” button to complete your connection to the new server.
Now let us take a look at the Advanced menu item. Clicking on “Advanced” will open the Options menu which has five tabs as is shown below. The five tabs are as follows:
- Information – This contains account, system and session information for the current session.
- Options – This has all of the connections options for the client.
- Log – This is a log of the connection procedural steps and can be useful to help diagnose connection issues. A copy of it should be included in tickets that you create for connection problems to help the StrongVPN staff diagnose and resolve your problem faster.
- Port List – This is a listing of all the ports that the client can use with the ability to add your own. Having access to multiple ports allows the VPN service to bypass blocked or restricted ports and still transfer all of its traffic.
- Port 53 – The default Domain Name Service (DNS) port.
- Port 123 – The Network Time Protocol (NTP) port which is used for time synchronization
- Port 268 – This the the port assigned to Tobit David Replica.
- Port 443 – This is the default port for HTTPS, secure Internet.
- Port 500 – Port 500 is used by the Internet key exchange (IKE) that occurs during the establishment of secure VPN tunnels.
- Port 518 – This is the Ntalk or New Talk port which makes possible the transmission of a datagram message from one computer to an application running on another computer.
- Port 547 – This is the DHCP server port for IPv6 and it allows a datagram message (UDP) to be transmitted from one computer to another.
- Port 812 – This is an unassigned port.
- Port 1029 – This port is designated for dynamic allocation by Windows.
- Port 1289 – This is the JWalkServer port.
- Port 2672 – This is the nhserver port which when used with UDP allows transmitting of datagram messages between computers.
- Port 8181 – This is mainly a port used by the TCP protocol for bi-directional messages once a connection has been established between devices.
- Port 8292 – This is a registered port by Bloomberg Professional.
- Port 5522 – This is an unassigned port.
- Port 3306 – This is the port used by MySQL and uses TCP.
- Licenses – This contains the StrongVPN End User License Agreement and other licenses used by the client.
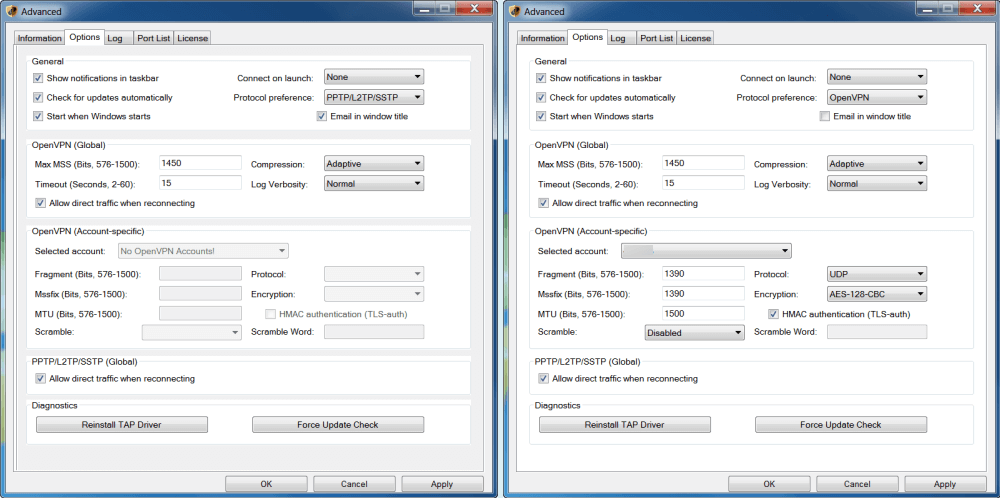
Now let us examine the Options tab in greater detail. The image above shows what the options tab looks like depending on the protocol preference you have chosen. The first shows the options when PPTP/L2TP/SSTP is the chosen protocol. Notice, it treats it as if no OpenVPN account exists. The second image shows the Options that are available if OpenVPN is your protocol preference. The options are divided into the following sections:
- General – This contains general startup preferences and your protocol preference.
- Show notifications in taskbar – This is what allowed you to see the connect and disconnect messages that we saw earlier in this section.
- Check for updates automatically – this can make sure you always have the latest version of the client.
- Start when Windows starts – Launch the client when you log into Windows.
- Connect on launch – If start when Windows starts is set then this allows you to automatically connect to you last connection or no connection. This will attempt to always be connected to the VPN when using the Internet unless the connection drops.
- Protocol preference – This allows you to manually choose the VPN connection protocol. Note you must first apply and then save these new settings. They will be applied the next time you use the client to make a connection.
- Package Tier – This will default to OpenVPN now with the new single tier.
- OpenVPN – This will allow you to choose between these three connection settings.
- OpenVPN TCP – This is the Transfer Control Protocol and is good for high latency connections and those which cannot tolerate packet loss. It provides error checking for packet order and loss and resends packets to correct. This is usually slower because of the extra overhead involved in this process. Would not be ideal for streaming.
- OpenVPN UDP – This is the User Datagram Protocol which is used with low latency connections and loss tolerating ones. This is the default OpenVPN protocol for the client and best for most users. It does not have to check for packet order or loss.
- OpenVPN Proxy – This is primarily used for users in China and Iran but could also provide faster streaming speeds depending on other OpenVPN settings.
- PPTP/L2TP/SSTP – This will allow you to use these other protocols to connect to the StrongVPN network using the client.
- PPTP – Not as secure as OpenVPN but can be faster and might be a good choice for streaming media.
- L2TP – This provides a good alternate choice to OpenVPN if SSTP does not work but can be slower due to double encapsulation.
- SSTP – A proprietary Microsoft protocol designed primarily for Windows. It is fast, secure, and reliable. This is the default client protocol if your preference is PPTP/L2TP/SSTP.
- OpenVPN (Global) – This contains global OpenVPN parameters. We recommend that you do not change Max MSS, Timeout, Compression, or Log Verbosity settings unless asked to by StrongVPN technical support personnel.
- Allow direct traffic while reconnecting –
- If this is checked, it will allow normal Internet traffic if the VPN connection drops. This can be convenient but remember this will expose your true IP address to the Internet.
- Disabling it will kill normal Internet traffic if the OpenVPN connection drops. This is StrongVPN’s implementation of an Internet kill switch for the OpenVPN protocol.
- Allow direct traffic while reconnecting –
- OpenVPN (Account-specific) – This contains OpenVPN preferences for your specific account number. We recommend that you do not change your account number, Fragment, Mssfix, or MTU unless directed to by StrongVPN technical support personnel. These later parameters have to do with packet fragmentation which can slow the VPN connection.
- Scramble – The scramble option adds an additional layer of complexity to the VPN connection between the OpenVPN client and OpenVPN server, making it more likely for the VPN to pass through the network unimpeded. This can help stop deep packet inspection techniques used for censorship.
- Disabled – Do not scramble.
- Password – A string (word) will be used to perform a simple XOR operation on the packet payload.
- Xorptrpos – This performs an XOR operation, using the current position in the packet payload.
- Reverse – This reverses all the packet data.
- Obfuscate – This uses a blend of all three methods above and is the most secure.
- Protocol – This allows you to choose between either TCP or UDP as your default IP transport protocol which we discussed above in protocol preferences.
- Encryption – This will let you choose the algorithm and strength of the encryption used for your VPN connections.
- Disabled – No encryption which could be good for streaming media where speed and not security is your main concern.
- BF CBC – This uses Blowfish Cipher Block Chaining (CBC) as an alternate to AES. This is a secure algorithm and was one of the runner-ups in the National Institute of Standards and Technology (NIST) competition.
- AES-128 CBC – Advanced Encryption Standard (AES) is the NIST chosen encryption protocol and the one used by the United States government for secret documents. This one uses a AES-128 CBC with a 128 bit key and will provide the best performance for most uses.
- AES-192 CBC – This one uses a AES-192 CBC with a 192 bit key to provide greater security.
- AES-256 CBC – This one uses a AES-256 CBC with a 256 bit key to provide the greatest security but at the expense of speed.
- Scramble – The scramble option adds an additional layer of complexity to the VPN connection between the OpenVPN client and OpenVPN server, making it more likely for the VPN to pass through the network unimpeded. This can help stop deep packet inspection techniques used for censorship.
- PPTP/L2TP/SSTP (Global) – This contains global settings for this protocol preference.
- Allow direct traffic while reconnecting –
- If this is checked, it will allow normal Internet traffic if the VPN connection drops. This can be convenient but remember this will expose your true IP address to the Internet.
- Disabling it will kill normal Internet traffic if the OpenVPN connection drops. This is StrongVPN’s implementation of a VPN kill switch for these connection protocols.
- HMAC authentication (TSL-auth) – Enabling this will keep you protected from active attacks like the so-called Man-in-the-Middle (MitM) attacks because it ensures that you are actually talking to a StrongVPN server and not an imposter. We recommend that you keep this enabled.
- Allow direct traffic while reconnecting –
- Diagnostics
- “Reinstall Tap Driver” button – This will let you fix corrupted Tap drivers which occasionally occurs when using VPNs.
- “Force Update Check” button – This allows you to check for updates immediately.
The final components of the Options tab are the buttons to apply, cancel or save your new preferences
Here are some endpoint encryption settings along with some comments about them.
- Maximum Protection – AES-256/HMAC enabled: This is for those who want the maximum security for their data and can accept the extra speed loss.
- Default Recommended Protection – AES-128/HMAC enabled: This provides the best balance of speed and protection and thus the desired setting for most users.
- Risky – AES-128/HMAC disabled: This configuration is suceptible to active MitM attacks.
- All Speed No Safety – None/HMAC disabled: This is suceptible to both active and passive attacks from outside third parties (hackers). You might as well not have a VPN as only your IP is hidden. This should only be used to bypass geo-restrictions.
The StrongVPN Windows client has a built in kill switch for those who want to guard against their true IP appearing on the Internet if the VPN connection drops. This is a nice feature and not included in software from most providers. It is easy to install for those who have less technical knowledge. StrongVPN connection defaults will allow you to use their VPN network of servers with just a couple of mouse clicks.
Those who want greater control over their VPN connections will also be happy because they have manual options for general client startup, connection protocols, and encryption algorithms and strength. For those who want even greater control, you can even modify VPN packets to guard against packet fragmentation which can slow down your connection. All that is necessary to connect to one of their VPN servers is to select its location from the dropdown list and click on the connect button.