![]() Download the StrongVPN Mac client from the setup page of their website. Select “Setup” from the site main menu and then click on the “StrongVPN for Macintosh” button. This will bring up a dialog window that will let you save the Mac client installation file to your computer. The client is compatible with Yosemite or El Capitan. This page also includes a link to a legacy client for Snow Leopard, Lion, Mountain Lion, and Mavericks users. The client setup page also has manual setup guides to configure various Mac OS X versions to use their service with L2T and PPTP.
Download the StrongVPN Mac client from the setup page of their website. Select “Setup” from the site main menu and then click on the “StrongVPN for Macintosh” button. This will bring up a dialog window that will let you save the Mac client installation file to your computer. The client is compatible with Yosemite or El Capitan. This page also includes a link to a legacy client for Snow Leopard, Lion, Mountain Lion, and Mavericks users. The client setup page also has manual setup guides to configure various Mac OS X versions to use their service with L2T and PPTP.
Once the client is downloaded to your computer, click on the StrongVPN application icon to open it. If you receive a warning, click on the “Open” button to show that you trust this app. Depending on where you downloaded the app, you may be prompted to move it to the applications folder. If you are so prompted, click on the “Move too applications folder” button.
You will now be presented with a login and verification page . Enter in your email address and password that you used when you created your account. These should also be found in your welcoming email from StrongVPN. Once you have correctly entered these, then click on the “Login” button. At this point, depending on your computer settings, you may have to enter your Mac credentials to allow the app to install its helper tools. If this is the case, then enter your credentials and click on the “Install helper” button. You will now see the StrongVPN client Window like the one shown in the images below.
The first screenshot below shows the client in its disconnected state. The screen consists of the following components:
- Blue”Connect” button – Click on this to connect to your chosen VPN location.
- Location selection icon – Clicking on this will bring up the server switching window. (pin over globe icon)
- Location – The currently selected location to connect to (Atlanta, United States)
- Status of connection – Disconnected
- Current IP – Your current IP address (Redacted)
- Time elapsed – The time since the session started (Not Connected)
- Account # – Legacy
- VPN server and protocol – The currently selected VPN server name (redacted) and the protocol used to connect to it (OpenVPN UDP)
- Diagnostics – Connection log file
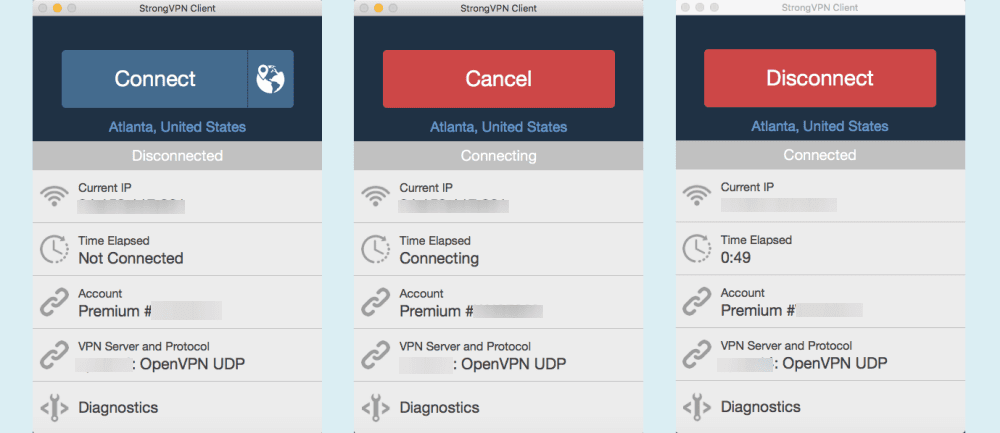
The second screenshot above shows the client when it is connecting. Notice the blue “Connect” button has been replaced by a red “Cancel” button, the location selection icon is gone, and the status and time elapsed now both say “Connecting”. The last screen above shows the client once it is connected to the StrongVPN network. The red “Cancel” button has been replaced by a red “Disconnect” button, the status now says, “Connected”, the Current IP has been changed to the one assigned by the VPN server, and the session time is now shown. Also, the icon in the launch menu will turn green.
Pressing the “Disconnect” button will return you to the first screen where you can select another server to switch to. Clicking on the server switch icon (pin over globe beside the “Connect” button) in the first image below will bring up a screen like that shown in the second image. This is the StrongVPN Server Switcher screen.
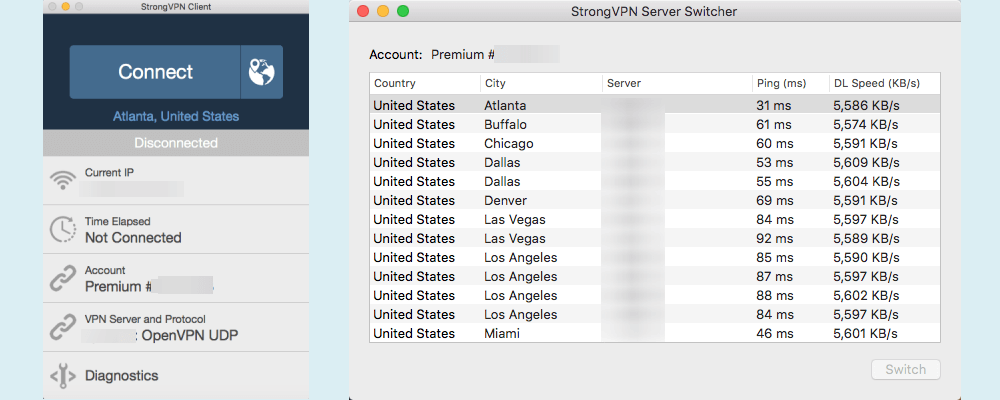
This is where you can switch from your current server and to a new one. It can be ordered alphabetically by country or city and numerically by ping time (ms) or download speed (KB/s). Generally if you choose a low ping server with good download speed, you will have the performance you want. But you want to change from the Atlanta server to another one. Looking at the list and comparing ping and download speeds, the Miami server seems to be your best choice. Highlight the Miami server line and click on the “Switch” button. This will change your current server to the Miami one and return you to the main StrongVPN client screen where you can complete the connection.
Clicking on the “VPN Server and Protocol ” line in the first image above will open the preferences screen with the advanced tab selected. This tab has the sever protocols which you can select from for your VPN connections. The server protocols that you can choose from are as follows:
- PPTP – This protocol may be slightly faster than some of the other protocols but not as secure. If speed is your primary goal then this would be a good choice for you. Streaming media is a good example use for this protocol.
- L2TP – This is a more secure protocol that PPTP. It might be a bit slower than some of the other protocols because of the double encapsulation that it uses.
- SSTP – This is a Microsoft designed protocol which was originally for Windows only but now has been ported to other operating systems. It provides excellent security and is useful for scaling firewalls used by some countries like China and Iran to censor their Internet traffic.
- IPsec – This provides a good balance between speed and security and may be faster than VPN.
- OpenVPN – This is the default protocol for the StrongVPN client and provides the best security. It is also good for bypassing firewall rules.
- TCP – This is the Transfer Control Protocol and is good for high latency connections and those which cannot tolerate packet loss. It provides error checking for packet order and loss and resends packets to correct. This is usually slower because of the extra overhead involved in this process. Would not be ideal for streaming.
- UDP – This is the User Datagram Protocol which is used with low latency connections. This is the default OpenVPN protocol for the client and best for most users. Does not have to check for packet order or loss. OpenVPN (UDP) is the default client protocol.
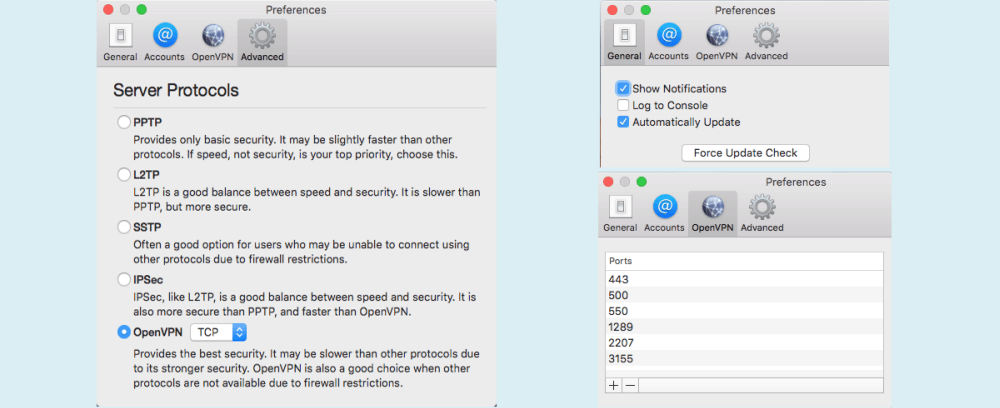
There are three other preferences tabs which include general, accounts, and OpenVPN. The accounts tab is for legacy StrongVPN accounts. The first tab, the general tab which is shown in the image above top-right contains a few setting that control the general behavior of the client. The settings are a as follows:
- Show Notifications – This will show connection, disconnection, and other messages in the launch menu near the icon.
- Log to Console – This will log diagnostics to the console so that they can be used to solve connection problems.
- Automatically Update – This will ensure that you will always have the most up-to-date version of the StrongVPN Mac OS X client.
The last thing on the general tab is a button to for a check for an immediate update instead of waiting till you restart the client.
The last tab on the preferences menu is the OpenVPN tab. This tab contains the ports that the OpenVPN client uses. The default ports used by OpenVPN is the Mac client are as follows:
- Port 443 – This is the default port for HTTPS, secure Internet an as such is almost never blocked as this will disrupt commerce.
- Port 500 – This is the port used by the Internet key exchange (IKE) that occurs during the establishment of secure VPN tunnels.
- Port 550 – This is the port designated as being used by the new rwho Unix daemon.
- Port 1289 – This is the JWalkServer port.
- Port 2207 – This is the port used by HP status and services.
- Port 3155 – This is the Jpeg/Mpeg and port used by some games.
You can add other ports to this list if necessary. Also you can remove ports if you need them available for other uses.
As you can see the StrongVPN Mac OS X client is simple to install. It makes it easy for Mac users to quickly connect and disconnect from the StrongVPN network. All that is necessary to connect to a VPN server is to select the location and click on the “Connect” Button. The client defaults to OpenVPN (UDP) which is the best protocol for both speed and security for most users. This means little technical knowledge is necessary to use their service.