 You can download the IPVanish Mac OS X client from the VPN setup page of their website by selecting “Apps” from the sites main menu. Once you get on this page, click on the Mac OS X button (shown on the left). This will load the Mac OS X setup sub-page which contains information on the latest Mac client. This page also contains step-by-step manual setup and visual guides for configuring Mac OS X with PPTP, L2TP, and OpenVPN.
Click on the orange “download software” button for Mac OS X 10.10+ to transfer the setup file to your computer. Once the installer (IPVanish.dmg) file is on your computer you will need to open it. Drag the IPVanish VPN app icon over to the applications folder in the window that appears. This will install IPVanish into your applications folder. Once IPVanish has been copied to your applications folder, it is installed and ready to use. This will install an icon to launch the IPVanish app on your launchpad.
To run IPVanish you will want to find the app in launchpad and open it. When you launch the Mac OS X app for the first time, you may encounter a security warning, just click open if you do. Once the app opens, you will be prompted to enter in your IPVanish username and password. Also, when running the Mac client for the first time, you will be prompted to enter your Mac system password to allow IPVanish to install its helper component.
The first thing you will see once the IPVanish Mac app has launched will be the dashboard (QuickConnect screen) as is shown in the image on the left below. From this image, we can see that we are not currently connected to the IPVanish network. This is indicated by the “OFF” message in the upper right hand corner. Also, no server or connection time is shown. The unconnected screen also shows your true IP address and location (redacted in our image). The new IPVanish v43 client gives you several ways to connect.
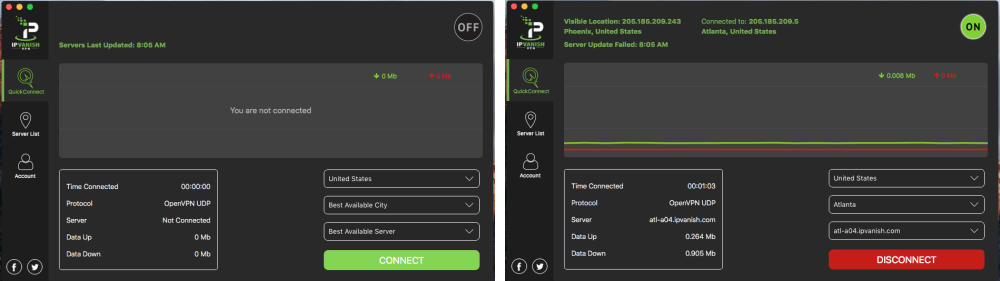
The QuickConnect screen will automatically connect you to the best server based on your current location. You can let the app do all the work or make your own selection. The dropdown boxes in the lower right hand corner of the screen will let you select any country, city, and server.
Once you have pressed the connect button, you will see a screen similar to the one shown on the right above. You can immediately tell that you are connected by the green “ON” connection message. The app now shows the new IP address assigned by the VPN server and our visible location. The app also shows the following as part of the dashboard menu:
- Visible Location – This is the location and IP address seen by others.
- Connected to – Shows the assigned IP and server location.
- Time connected – The time since this session started.
- Protocol – The protocol used in the current VPN connection.
- Server – The name of the server that you are connected to.
- Data Up – Stats for the total data uploaded while connected.
- Data Down – Stats for the total data downloaded while connected.
The middle of the connected dashboard screenshot shows the instantaneous download speed in green and upload speed in red along with a graph of them over time.
Now let us take a closer look at the two ways of selecting servers in the IPVanish Mac OS X app: by map and by city. These are depicted in the images below.
The first image shows the by map screen. This map screen represents the IPVanish servers as circles with numbers in them. These numbers represent the number of servers in that area. The map screen lets you zoom in to increase the detail and localize the servers to make it easier to select and connect to them. Clicking on a circle with a one in it will select that server for you connect to. Once you have selected a server, just click to connect button as we did above to complete the connection. Alternately, you can click on the location and connect to the chosen server. Once the connection has been made the dashboard will show us the details.
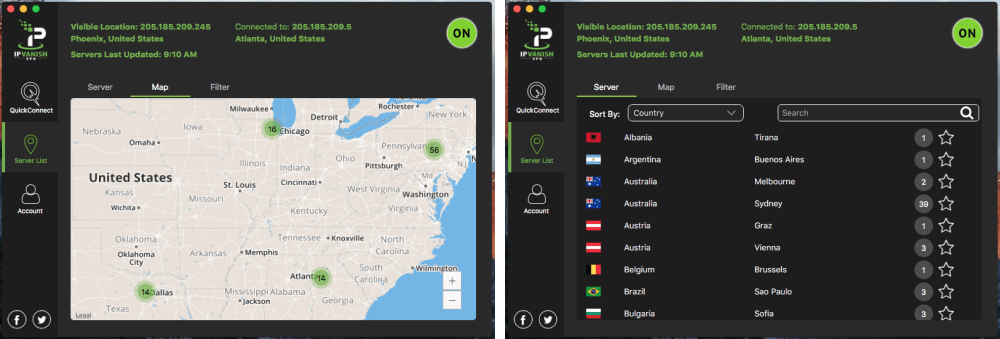
The second way that you can connect to a server in the IPVanish network using the Mac app is to use the by server list menu option. It will show you a list of the VPN servers in the IPVanish network by city. You can order this list by city, country, or servers. You can also use the search box to find any server location.The new IPVanish app also has a filter tab to help you find the best server. You can use it to filter by region and latency time. You can also search for servers on this screen with the filters applied.
The final area we will examine in detail is settings. You can access them by clicking on IPVanish VPN at the top of your Mac and then on preferences. The resulting settings menu has three tabs: general, connection, and IP settings. These are shown in the below image.

The first image shows the settings general setup tab. It primarily controls the apps startup behavior and appearance. It is divided into five sections as follows:
- System Startup – This controls how and when the app starts.
- Launch and connect at login
- Hide IPVanish on startup
- Hide IPVanish from dock
- Onboarding – Show tutorial at launch
- IPVanish Startup – Client startup options
- Do not automatically connect
- Connect to last connected server
- Connect to fastest server
- Connect to fastest server in selected country
The screens below allow you to control some of the more advanced connection features of the IPVanish Mac app. Let’s take a closer look at the remaining tabs to set up their Mac client to protect your online privacy.
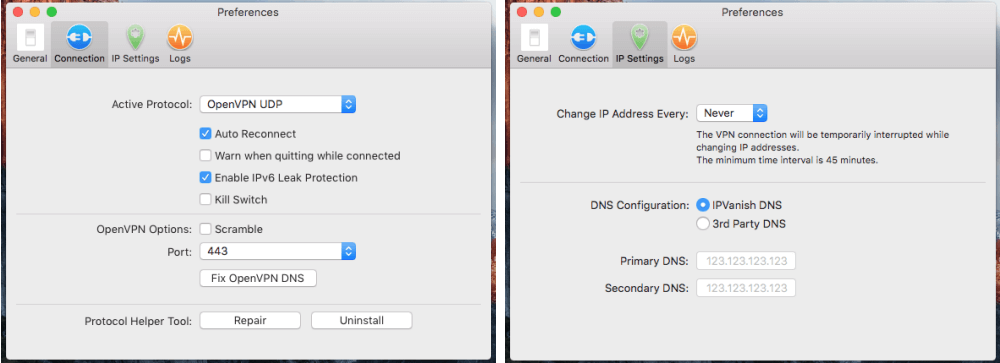
The connection section controls some of the IPVanish apps most advanced features like the kill switch. It is organized as follows:
- Active Protocol – Choose which protocol you want to use to connect.
- OpenVPN (UDP) – Good balance of privacy and performance.
- OpenVPN (TCP) – This will often work if OpenVPN (UDP) does not but can be slower.
- L2TP – This provides an alternate way to connect and still maintain a comparable level of security to OpenVPN but will usually be slower.
- PPTP – Only use this for low security applications like video streaming because it has known security vulnerabilities.
- Automatically Reconnect – Enabling this will aid in always keeping your VPN connection up.
- Warn when quitting while connected
- Enable IPv6 Leak Protection – Protect against IPv6 leaks
- Kill Switch – Enabling this will ensure that if your connection is lost, all Internet traffic will cease. This can help to protect your privacy while using the IPVanish service by keeping your true IP address secret if the connection drops.
- OpenVPN Options
- Scramble – Enable in countries that use deep packet inspection
- The port for the OpenVPN protocol can also be changed
- Port 443 – This is the default client port and the default port used for https traffic.
- Port 1194 – This is the port normally used for OpenVPN traffic
- Fix OpenVPN DNS
- Repair or uninstall the protocol helper tool
The IP settings tab includes a few more advanced features:
- Change IP Address Every – Enabling this will allow you to periodically change you IP address.
- It allows you to set this time interval in minutes with a minimum time interval of 45 minutes and maximum of two hours.
- This will temporarily interrupt your connection while a new address is being assigned.
- If the kill switch has been set this will also make your Internet unavailable while a new IP address is being obtained.
- Taking advantage of this feature will help to make you even more anonymous while using the IPVanish service.
- DNS Configuration – Use IPVanish DNS or configure 3rd party DNS
- IPVanish DNS – default option and the one we use
- 3rd Party DNS – set your own DNS servers
The DNS section is pretty straight forward. It allows you to reset your DNS configuration from the Mac app. By default the app uses the IPVanish DNS servers when you are connected to their network but you can change this to other DNS servers such as Google’s if you want. It allows you to enter the primary and secondary IP addresses for your chosen DNS servers and resets them from the client.
The IPVanish client for Mac OS X has the same look and feel of their Windows and mobile apps. It allows Mac users to connect and disconnect from their network with a single click. You can view the specifics for any server. The app has a kill switch. Indeed, IPVanish is one of the only Mac clients that we know of to include this advanced feature. This feature will help to protect your privacy by assuring that you will always be connected to their service while using the Internet. Another unique feature is the ability to periodically change your IP address. The IPVanish Mac OS X app defaults to the OpenVPN protocol so you will always know your connection is secure when you are connected to one of their VPN servers.