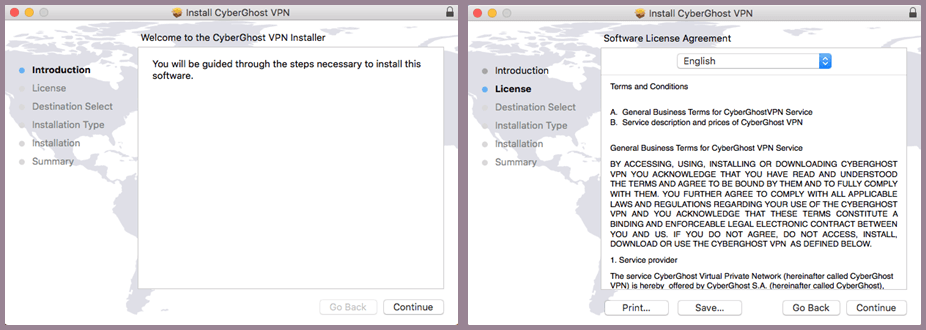
Already a Cyberghost member? If not you can sign up for unlimited VPN access for just $2.23 a month. After you have downloaded the app installer to your to your Mac, you will need to open it to complete its installation. It will then guide you step-by-step through this process. Selecting “Continue” will move to you the next step. This begins by welcoming you to CyberGhost and then presenting you a copy of their TOS for you to examine. If you are satisfied by the TOS. click “Continue”.
 Next, you choose where you want to install the CyberGhost VPN software. You can accept the default unless you have a specific place you will to install the app.
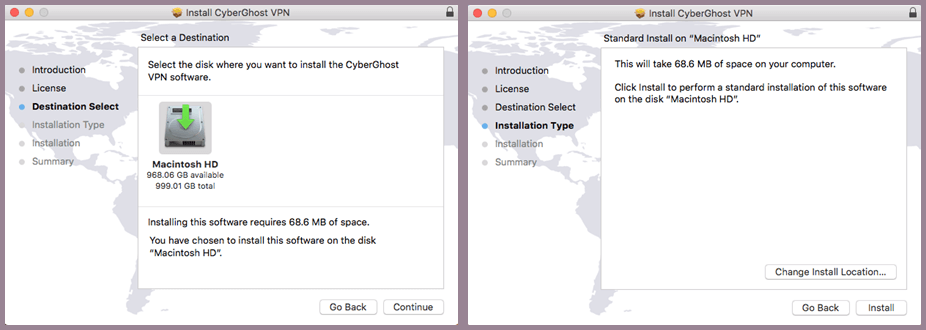 You can then choose the type of installation but we recommend you just install its defaults. When you are happy with your choices, then click “Install”
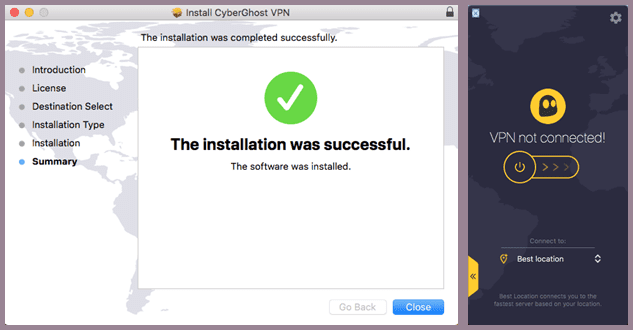 After a short period, you will see the installation successful message. Click close and you will see the app authentication screen. Once your account has been verified, the app dashboard displays.
Authenticating Your CyberGhost VPN Account
Before you can begin using the CyberGhost VPN service, you need to verify your account. You should have created an account as part of your earlier Premium subscription process. Therefore, select the “Return to login” link to enter your credentials. These will consist of either your “Email/Username” and “Password” that you chose when you subscribed.
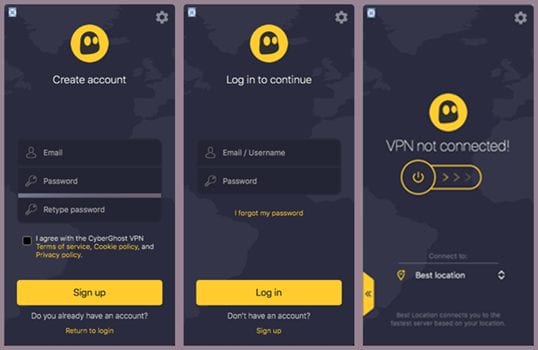 After you enter these, click on the “Log in” button. Afterwards the main dashboard for the Mac OS X app will open. Let us take a moment to examine the dashboard features.
CyberGhost Mac App Main Dashboard
The CyberGhost VPN dashboard is designed for ease of use. It consists of a few basic components. These are as follows:
-
- App control – returns the app to the Mac Menu bar. We will see this when we look at how to quick-connect using the app.
- Main app menu – allows you to control the set app preferences, examine your account, create a ticket, log out, or exit the app.
- Connection toggle – makes it easy to connect and disconnect from your chosen VPN server.
- Connection state – lets you see whether you are protected at a glance.
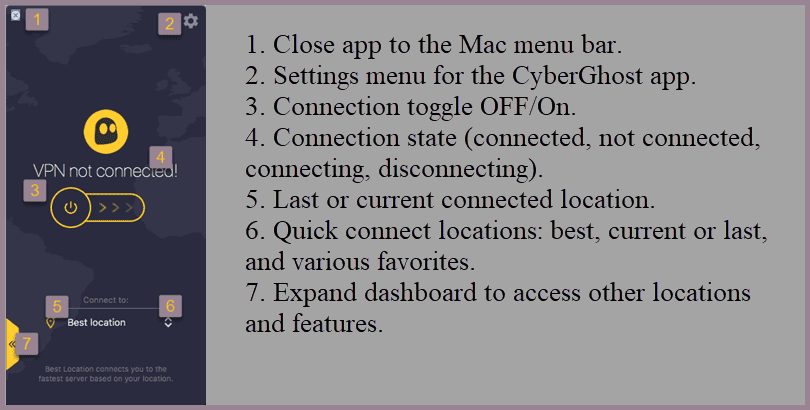
- Current or last connection – makes it easy to reconnect to a previously used VPN server.
- Quick connect locations – include best, current or last, and any favorites created.
- Tab – that expands the CyberGhost app dashboard to allow you to access other VPN servers and advanced connection features.
Your First CyberGhost VPN Connection
Your first CyberGhost VPN connection could not be any easier. Simply toggle the connection “On”. By default this will connect you to the best (fastest) location from your current location for general Internet surfing. It determines this based on the distance from you, ping value, and load % of the VPN servers closest to you.
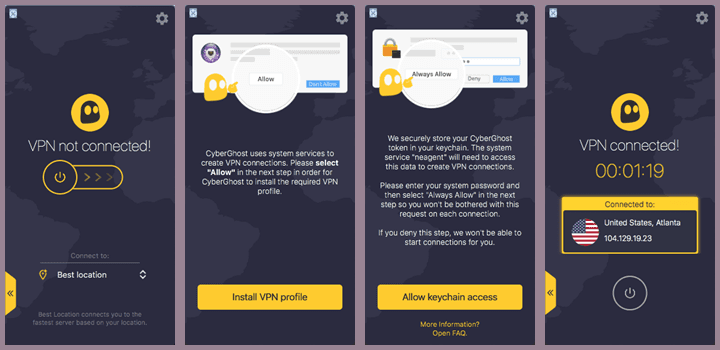 Since this is your first connection, you will have to allow CyberGhost to establish the VPN service on your Mac device. You will also have to provide your system password unless you want to manually enter it for every connection that your make. Once you provide these permissions, the connection is completed. Before we examine the other ways that you can connect to the CyberGhost VPN service, lets use look at its main menu, other settings, and additional connection preferences.
CyberGhost VPN Mac OS X App Menu
The menu can be accessed by selecting the gear icon on the main dashboard. This menu contains the following elements:
- Preferences – which opens the settings screen. This screen is divided into three tabs: General, Account, and Connection.
- Account – displays information about your account, lets you manage it, and allows you to log out if necessary. This is the same screen shown under the VPN settings account tab.
- Send feedback – opens a ticket form to that allows you correspond with the CyberGhost VPN support team. You can send useful feedback or create a support ticket.
- CyberGhost help and FAQ – opens the website page for you to find answers to questions you may have.
- Log out – lets you log out of one account and into another if required.
- Quit CyberGhost VPN – closes the Mac OS X app and removes it from the app menu bar.
Now let us examine the Preferences (Settings) in greater detail. As we previously stated this screen has three tabs: General, Account, and Connection. The General tab is divided into two categories: runtime and support.
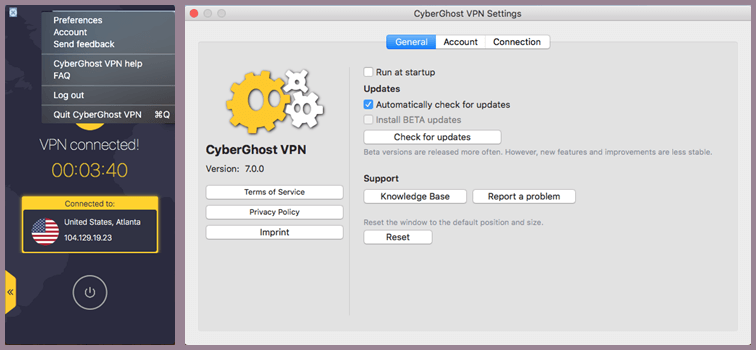
The runtime category allows you to choose to run the app on startup so that you are always protected when connected to the Internet with proper network connection settings. It also allows you to automatically check for updates so that you have the latest version of the software. Else, you can manually check for and install new updates. Alternately, you can install Beta releases but be aware that these can be unstable.
The second category is support. This will allow you to open the CyberGhost VPN FAQ and knowledgebase. It will also let you create a support ticket to get answers to your problems if necessary. This tab also displays version information and has links to the CyberGhost’s TOS and Privacy Policy. Finally if you have modified the app window position or size, you can restore it to its default from here.
The second tab is the same as the Account menu item. It displays your account “Username”. “Email address”, “Plan”, “Expiration date”, and “Number of simultaneous devices installed. Their is also a link to the CyberGhost website to manage your account. Finally, you can log out of your account from here. Remember that if you do, you will have to log back in the next time you use the service.
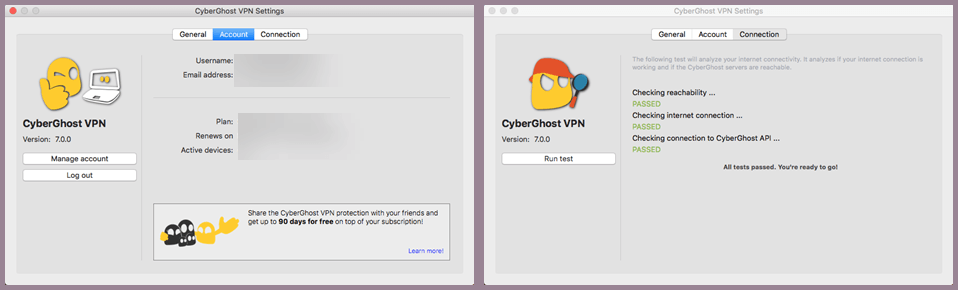 The final tab lets you run a connection test to set if you have any connection issues with the CyberGhost VPN network. It checks whether you can reach their network, your Internet connection stability, and if you have any CyberGhost API connection problems. It you pass all of these test, you should not have any problems connecting to the CyberGhost VPN service.
CyberGhost VPN Mac App Advanced Features
The Mac OS X app advanced features are accessible by expanding the main dashboard using the small tab on its lower-left side. These are divided into two categories: Connection and Smart network rules.
Connection Features
The connection features are server-side options that you can set that will help increase your overall security and privacy while using the CyberGhost VPN network. They include the following:
- Block ads – stops annoying pop-up ads and videos which can lead to less cluttered websites and faster load times.
- Block malicious websites – filters websites before the reach you using firewall rules so that you are more secure when using the CyberGhost network.
- Data compression – compresses some images and other large elements to decrease your Internet traffic usage. This is helpful if you are on a paid data plan.
- Block online tracking – keeps known trackers from creating profiles of your Internet preferences and usage traffic.
- Automated HTTPS redirect – ensures end-to-end encryption to your destination URLs when available.
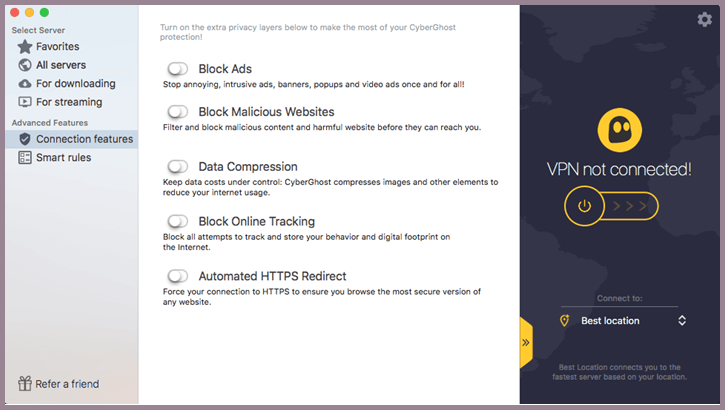 You should probably take advantage of most of these as they can all improve your overall experience while using the CyberGhost VPN service. The exception may be the encryption which you should not set if you have unlimited Internet usage through your ISP.
Smart Network Rules
Smart rules are implemented on your device to help ensure that you will always be connected to the CyberGhost service while using the Internet. The first of these is auto-connect on startup. Setting this and auto startup ensures that when you start your Mac the CyberGhost service will also start and connect you to your last connected VPN location.
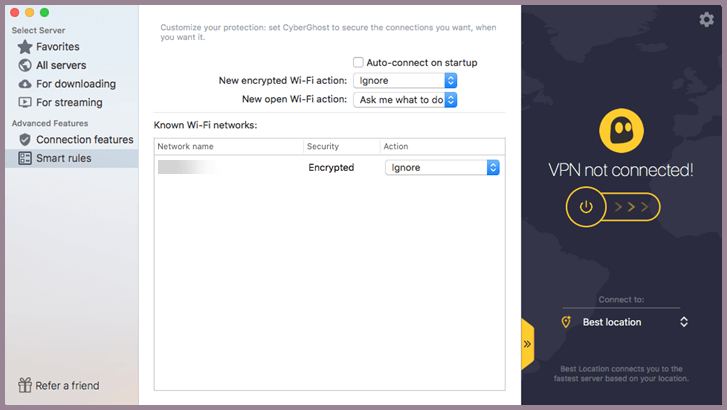 The other rules refer to network connections. You can choose how the software handles Open Wi-Fi, password Encrypted Wi-Fi, and known networks. Your choices are as follows:
- Ignore connection – is never recommended as you can always manually disconnect anytime you need to.
- Always connect – is a good choice for unsecured Wi-Fi networks.
- Ask me – and let me decide on an individual network basis.
We prefer the ask me choice because we like to monitor the wild Wi-Fi networks our device might attempt to access. Therefore, we recommend ask or always connect for all of these, especially the open unsecured Wi-Fi networks.
Connecting to the CyberGhost Service with the Mac App
We have examined the app menu, extra security features, and network preferences. Now, let us have a look at the various ways we can use the CyberGhost service to surf the Internet, as well as accomplish other usage purposes. First we note that you can return to the best server at any time by selecting it from the maim dashboard or the Quick-connect menu. This means we can easily find and connect to a fast server for general Internet surfing with just a couple of clicks. First, select the “Best location” link. Then, toggle the VPN connection on.
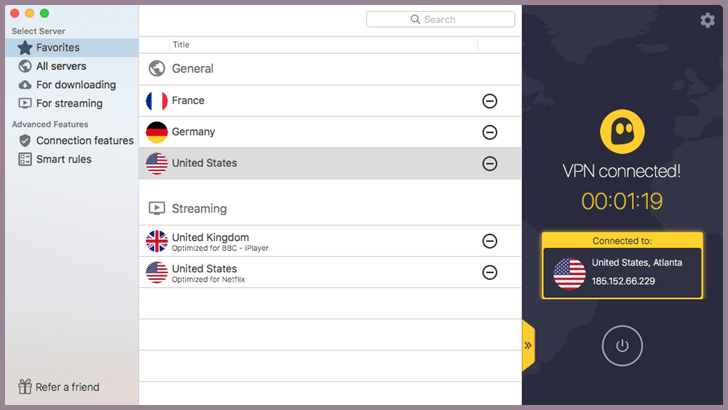
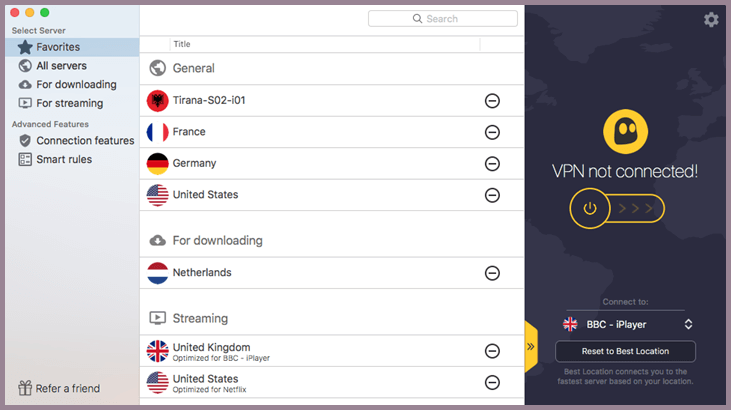
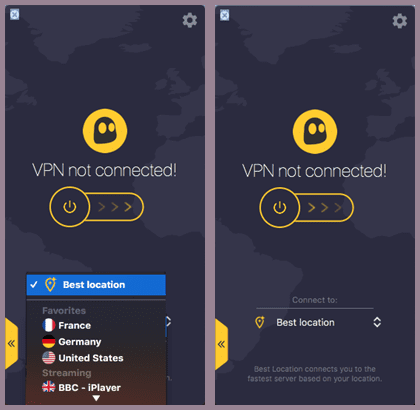 You can also connect to your favorites from the quick-connect location menu. Favorites are divided into General (All servers), Downloading, and Streaming categories. to make it easy to access a fast server for your VPN purpose. These correspond to the server lists that you can choose from in the extended CyberGhost VPN app dashboard.
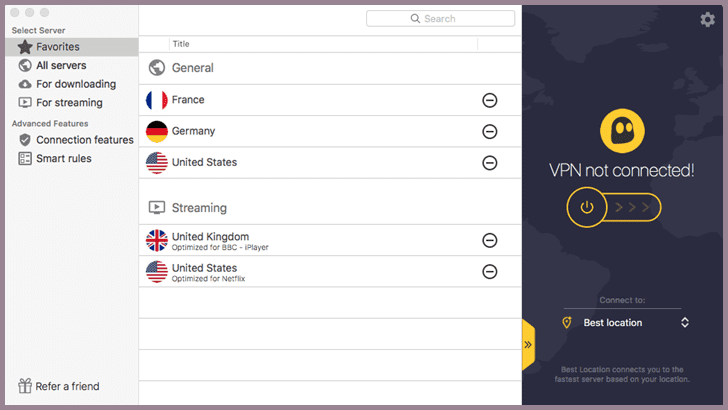 By default these include the following:
- General (all servers) – include VPN servers in France, Germany, and the United States.
- Streaming – servers include those optimized for BBB – iPlayer in the United Kingdom and Netflix in the United States.
Here, we have connected to a general server in the United States using our favorites list.
 We will take a look at our favorites later in this review once new ones have been added to see how creating new Favorites can simplify our CyberGhost VPN network usage.
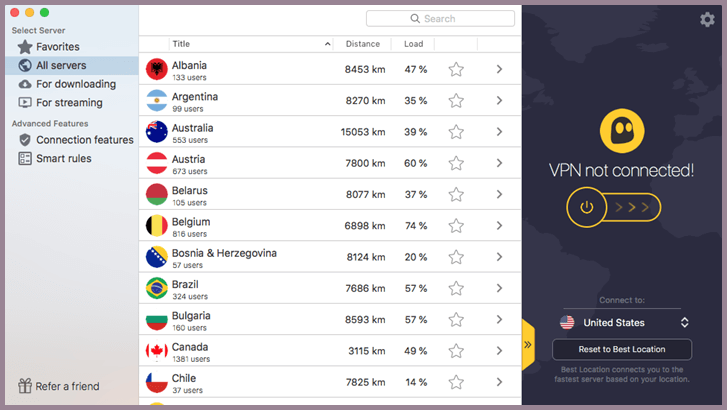
Choosing a New Connection Location from All Servers
You can not only connect to a specific country using the all server list but also individual local servers within your chosen country. Another advantage of selecting our location using the all servers list is that we can see additional network data. This data includes: the number of users, distance from us, local network load percentage, and favorite status for both the country, as well as, individual servers within the country.
Connecting to a Local Server Inside a Particular Country
To access an individual server list for a country, choose the country you want to see the server list for and click on the right arrow to the right of it. This will open the expanded server list for that country.
 Here is the expanded list for Albania. You can now see the distance, load percentage, and favorite status for each individual server in the Albania server bank. We can see that that the servers are all the same distance and that the Tirana-S02-i06 server has the lowest load at the moment so we have selected it to connect to.
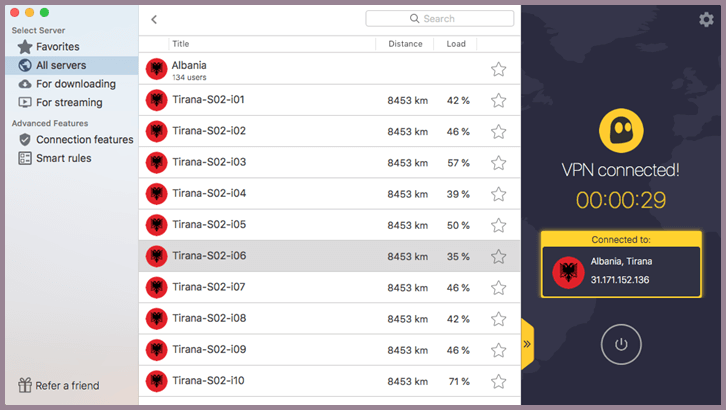 This connection can be made by double-clicking on selecting the server and then toggling the connection “On”. Also, click on the star beside the Tirana- S02-i01 to select it as a new favorite. It will turn grey indicating that it is now a favorite. Finally, select back or All servers to return to the all countries list.
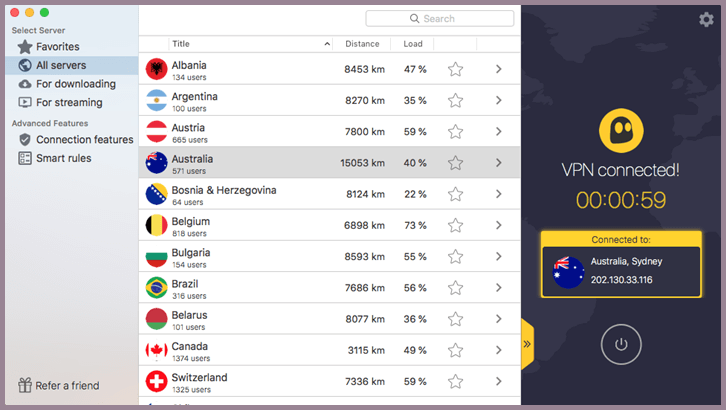
Connecting to a New VPN Server in Another Country
From here you can connect to the country of your choice. The software will select the individual server in your chosen country for you. It does this similarly to connecting to the best server from your location. Here we have connected to an Australian VPN server by selecting it by double-clicking on it. Notice that it has replaced our Albanian VPN server. This is one advantage of the lists is that they make it easy to switch servers without the need to disconnect from your current one.
 Now let us take a look at some other list that make it easy to choose a fast server by VPN purpose. The purposes that the CyberGhost VPN service supports are downloading files and streaming various geo-based media libraries.
Connecting to a Server Optimized for File Downloading
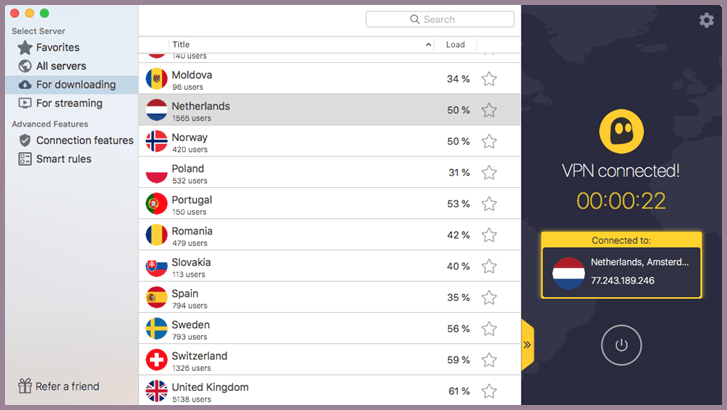
Clicking on the For downloading list open a list of countries that CyberGhost allows file downloads (P2P) through. These are generally countries with less restrictive rules regarding (P2P) traffic. Here, we have selected the Netherlands for our traffic. The software will then choose a fast server optimized for downloads in the Netherlands VPN server bank locations and completes our CyberGhost network connection. Click on the star beside Netherlands to favor it for downloading files.
 Connecting to a Server Optimized for Streaming Media Services
Connecting for stream media services is just as easy as choosing a country for downloading files. The difference is that we select both the country and service for the media (ie., US – Netflix) that we want to stream. Here we have chosen to connect to the BBC – iPlayer in the United Kingdom. Notice that the software has replaced our server for downloading files with one optimized for BBC – iPlayer in the United Kingdom. Also notice that the starts for both US – Netflix and UK – BBC iPlayer are favorites. This is indicated by the gray stars beside them.
 We mentioned earlier that we would take another look at our favorites list after we examined the various ways that you can connect to the CyberGhost VPN network. You can see that our favorites list now includes the two new favorites that were created as we examined connections to the CyberGhost network.
 The Tirana- S02-i01 now appears in our general category. This means we can also include favorite individual servers, as well as, countries. We also see that the list now has a country favorite for downloading files, the Netherlands.
Make Quick Connections to the CyberGhost Network
Creating new favorites allows you to take advantage of using the Mac menu bar to quickly create connections to the CyberGhost VPN service. Notice that our last connection was to the server optimized for the BBC -iPlayer as shown by the check beside it. Now suppose, we wanted to connect to a server in Germany. All we have to do is select it in our quick-connect list.
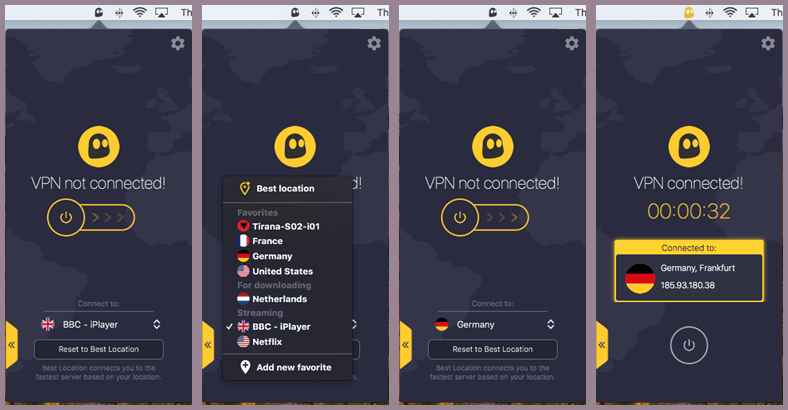
Toggling the connection “On” completes our server change. and the notice our icon for the app on the bar turn yellow. Selecting it shows our current connection. We could just as easily disconnect from the German server and choose a fast server for downloading or to stream US – Netflix using the menu app icon.