 You can grab the latest version of the PIA Mac OS X app from the client download page of their website. Go to the top of the site and click on “Support” and then “Client Download & Support”. Now you want to click on the “Download” button in the Mac OS X box on the page to follow. This will bring up a dialog window that will let you save the Mac OS X client installer (.DMG file) to your computer. The Mac OS X client requires OS X 10.8 or newer. The client setup page also has manual setup guides to configure Mac OS X to use their service with OpenVPN, Viscosity, L2TP/IPsec + PSK, and as a last resort if nothing else works PPTP.
Once the client is downloaded to your computer, open the .DMG file and double click the Private Internet Access Installer.app. Once the installer app finishes, you will see a screen similar to the one below.
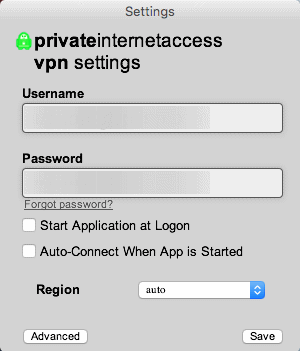
Enter your “Username” and “Password” from your welcoming email. It you have forgotten your password, you can click the “forgot password” option to start the process to reset it. You can also choose to set the following basic options:
- Start application at login – This will start the client as soon as you log into to your computer.
- Auto-Connect when app is started – This will auto-connect to your chosen location when the client starts.
- Region – This allows you to choose the country that you want to auto-connect to. If set to auto, it will connect you to the fastest server based on your current location.
Once you have set these basic options, then click the “Save” button and the client will finish launching. We will discus the advanced options later in this section. The client does not have a graphical user interface. It simply loads into the menu bar as an icon and looks like the image on the left below. Clicking on the icon will display a list of locations that you can connect to. Notice, “Disconnect” has been greyed out but “Connect” and all the locations are selectable. This indicates that you are not currently connected. The middle image shows that there are other locations that you can connect to by selecting “More”. Selecting “Connect” will connect you to our last used location. Clicking on any of the regions will connect you to that location. The last image illustrates what the client looks like when you are connected to the Private Internet Access network. Notice, “Disconnect” is the only choice that you have. The check mark next to the icon also indicates that you are currently connected to the PIA network.
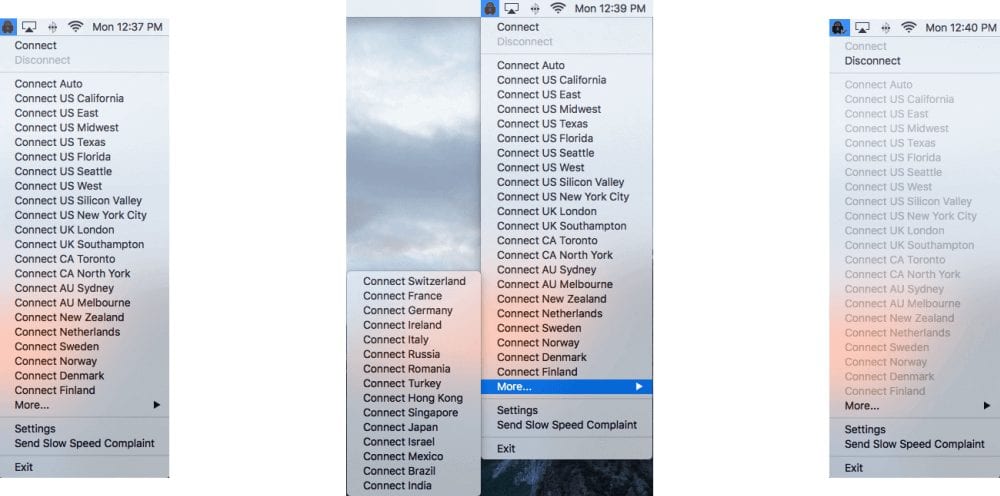
There are a few more list items in the client shown above. The last list item “Exit” closes out your connection and shuts down the client. The second, “Send Slow Speed Complaint” will let the technical support staff at PIA know that they have an issue. The first is “Settings” which will open the settings window which we looked at in the beginning of this section. We are now going to take an in-depth look at the advanced features that the PIA client offers. These are accessed by clicking on the “Advanced” button on the basic login-settings screen that we examined previously.
The two advanced settings screens are shown below. The one that we want to examine first is on the right below. This is the advanced connections settings screen. The setting options that you can choose are as follows:
Connection type – Their are two types of connections possible with the OpenVPN protocol over IP.
- UDP – This is the User Datagram Protocol which is used with low latency connections and that can tolerate some loss in packets. This is the default OpenVPN protocol for the PIA Mac OS X client and best for most users. It does not have to check for packet order or loss but can do a checksum if desired.
- TCP – This is the Transfer Control Protocol and is good for high latency connections and those which cannot tolerate any loss. It provides error checking for packet order and loss and resends packets if necessary. This makes it slower because of the extra overhead involved in error checking and resending of packets in the proper order.
- Remote Port – This lets you choose the remote port to tunnel data through.
- Port 1194 – This is the standard OpenVPN port.
- Port 8080 – This is the alternative port to Port 80 for HTTP web services. It is commonly used for proxy port.
- Port 9201 – This is the port used for WAP (Wireless Application Protocol) services on mobile devices.
- Port 53 – This is the port used by DNS for requests.
- Local port – This allows you to set a local port to send data through which is then redirected to the remote port.
- Port forwarding – Turning this on allows you to set up an application which allows remote users to connect to it. The remote users must know the device name and the port number to successfully connect to it.
- Port forwarding is only through the following gateways: CA Toronto, CA North York, Netherlands, Sweden, Switzerland, France, Germany, Russia, Romania, and Israel.
- After enabling port forwarding and re-connecting, hover the mouse over the menu icon to see the port number to put in your application.
- This will reduce your privacy.
- VPN kill switch – Once set, this will kill all Internet traffic from the device if the VPN connection is dropped.
- It will restore Internet traffic once the connection starts up again.
- Disabling the kill switch or exiting the VPN client will also restore normal Internet operation.
- IPv6 leak protection – This disables a IPv6 request while using the VPN.
- Small packets – This transfers the data in smaller packets which can fix some network issues with some firewall or setups.
The links shown under port forwarding, VPN kill switch, and IPv6 leak protection will take you to guides on the Private Internet Access website which contain more detailed information about that particular setting. Clicking on the “Encryption” button in the image on the left below will replace the connection settings with the encryption options as shown in the image on the right below.
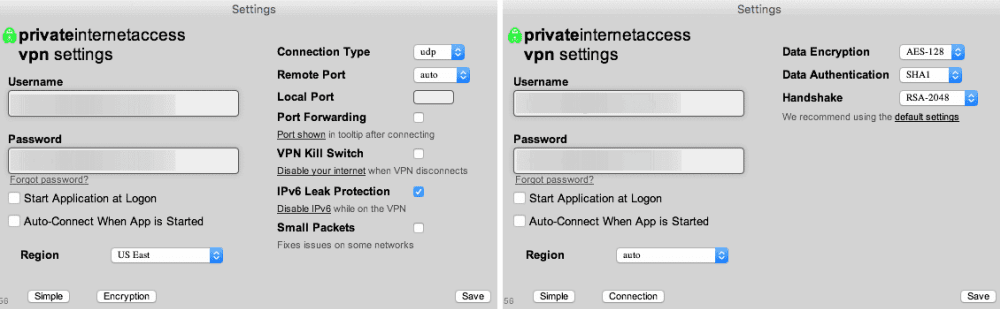
The encryption screen has the following settings that you can modify:
- Data Encryption – This is the encryption used to encrypt and decrypt all of your Internet traffic once the initial secure tunnel has been established between your computer and a PIA server.
- AES-128 – Advanced Encryption Standard (AES) is the National Institute of Standards and Technology’s (NIST) chosen protocol and the one used by the United States government for some secret documents. This one uses AES-128 CBC (Cipher Block Chaining) with a 128 bit key and should provide the best performance for most uses.
- AES-256 – This uses the same encryption algorithm as above. AES-256 CBC uses a 256 bit key thus is more secure and slower. This is used by the US government for some top secret documents.
- Blowfish – This uses Blowfish-128 CBC with a 128 bit key as an alternate to AES. This is a secure algorithm and was one of the runner-ups in the NIST standards competition.
- None – This does not encrypt your data and is not recommended as it only hides you IP and thus means the VPN is being used as a pseudo proxy. You will be susceptible to passive attacks where your data is recorded by a third party without your knowledge. This can be used to help remove geo-blocks.
- Data Authentication – This refers to the algorithm that authenticates all of your data to guard against active attacks (attack where an entity adds or removes packets from your message).
- SHA1 – This uses HMAC (Key-Hash Message Authentication Code) with a 160 bit key.
- SHA256 – This utilizes HMAC with a 256 bit key and is thus slower.
- None – This opens you up for active attacks or Man-in-the-Middle (MitM) from outside sources where the attacker intercepts your message and then alters it before sending it on the VPN server without your knowledge.
- Handshake – This is the algorithm which establishes the initial secure connection and verifies that you are talking to a PIA VPN Server and not an imposter. Hence the name handshake. Private Internet Access uses Transport Secure Layer v1.2 (TSL 1.2) for this connection and all certificates are signed using SHA512.
- RSA-2048 – This uses a 2048 bit Ephemeral Diffie-Hellman (DH) key exchange and 2048bit RSA certificate for verification.
- RSA-3072 – This uses the same algorithm as above with 3072 bit for both key exchange and RSA certificate.
- RSA-4096 – This uses the same algorithm as above with 4096 bit for both key exchange and RSA certificate.
- ECC-256k1 — Ephemeral Elliptic Curve DH key exchange and an Elliptic Curve Digital Signature Algorithm (ECDSA) certificate for verification. Curve secp256k1 (256bit) which is the curve that Bitcoin uses for its transactions is used for both the key exchange and the certificate.
- ECC-256r1 — Like above but curve prime256v1 (256 bit, also known as secp256r1) is used for both the key exchange and the certificate.
- ECC-521 — Like above but curve secp521r1 (521 bit) is used for both the key exchange and the certificate.
The Mac OS X client defaults to AES-128/SHA1/RSA-2048 which should provide the best balance of performance and security for most users. Clicking on the “default settings” link will take you to the VPN encryption page on their website.
Below are some endpoint encryption settings along with helpful suggestions for their use or non-use.
- Maximum Protection – AES-256/SHA256/RSA-4096: This is for those who want the maximum security for their data and do not mind the extra speed loss.
- Default Recommended Protection – AES-128/SHA1/RSA-2048: This provides the best balance of speed and protection and is the best setting for most users.
- Risky – AES-128/None/RSA-2048: This configuration is suceptible to active MitM attacks where a hacker intercepts the message and modifies it before sending to the recipient.
- All Speed No Safety – None/None/ECC-256k1: This is suceptible to both active and passive attacks from outside third parties (hackers). You might as well not have a VPN as only your IP is hidden. This makes the connection act like a SOCKS proxy.
The Private Internet Access Mac OS X client may not be the prettiest VPN client in the industry today, but it offers some of the most advanced features that are available to VPNs like a kill switch, disabling IPv6 Internet traffic, and small packets. This makes it appealing to the more technical users. At the same time it has a simple mode that is best for most uses. All that is necessary to connect to one of their VPN servers is to select its location from the list that appears when you click on the client icon in the menu area. It does not get much easier than that.