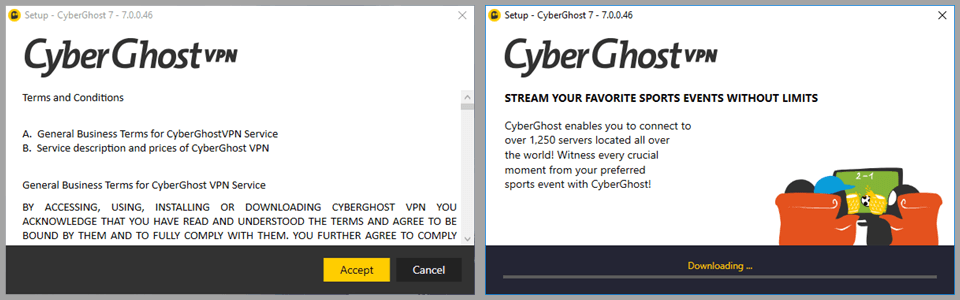
The first step is to subscribe to the service. The CyberGhost team is kindly offering our guests unlimited VPN access for just $2.23 a month. After you download the setup file to your computer from the CyberGhost website, you need to run it as administrator to begin the installation process. This will open a warning that a program wants to make changes to your machine. Allow it to and you will see the CyberGhost license screen. Accept the TOS agreement and the CyberGhost 8 Windows client software will continue downloading.
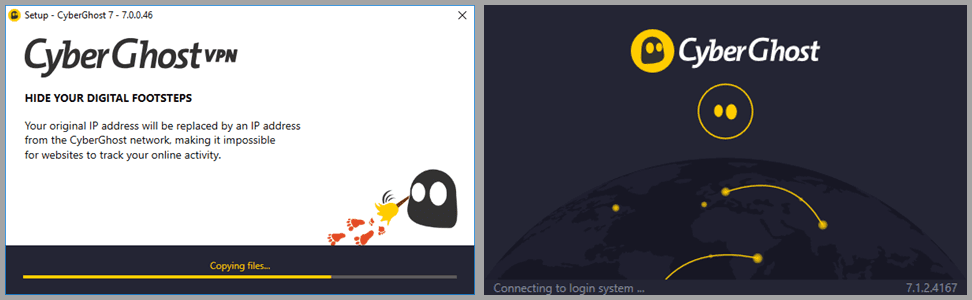
 It will then copy all necessary setup files to its default folder and install the TAP network driver and then connect to the login system.
Account Registration/Login
After a short period, the account creation/login screen will open. If you do not yet have a CyberGhost VPN account:
- First create a CyberGhost VPN account on their website.
- You will then be sent a confirmation email from CyberGhost. Check your Inbox for this email and click on the included confirmation link. Next, go back to the CyberGhost app.
- Once you return to client, click on “Return to login” and enter your newly created account “Username” and “Password”.
- Finally, select “Log in” to begin using their service.
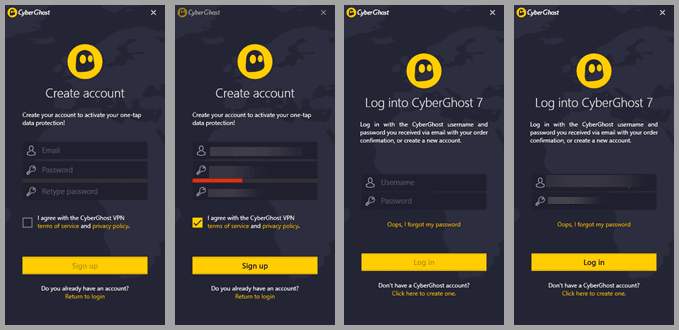 Else if you already have a premium subscription, then just click on “Return to login”. After you enter your “Username” and “Password” the “Log In” button will activate. Click on it to complete the authentication process and open the CyberGhost VPN client dashboard.
CyberGhost VPN Windows App Dashboard
Before we use the app to connect to the CyberGhost service, let us examine its main dashboard in more detail. We have labelled these details from 1-7:
- Client controls (1) are used to control how the software is displayed. You can shrink it to the Windows task bar, display it full page, or send it to the system tray.
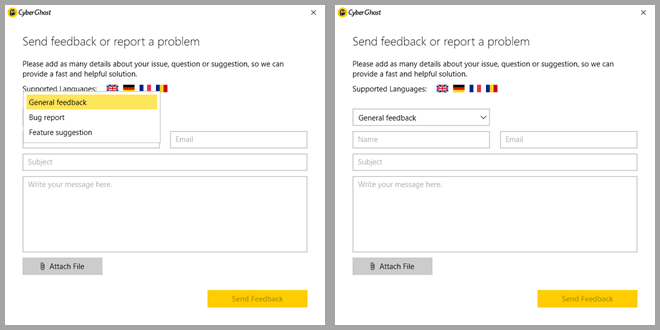
- Support icon (2)- allows you to send feedback or get answers to problems that you may have. Form is shown above.
- Choose a supported language, and topic (General feedback; Bug report; or Feature suggestion)
- Enter your “Name”, “Email”, and “Subject”.
- Briefly describe your suggestion or problem and attach helpful files.
- Finally, click on the “Send feedback” button.
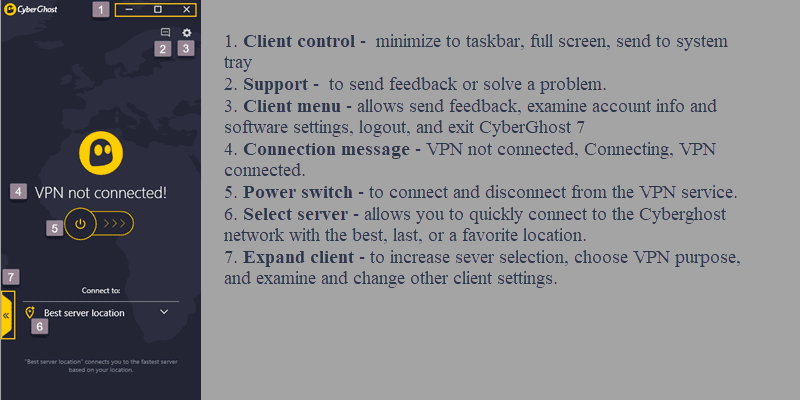
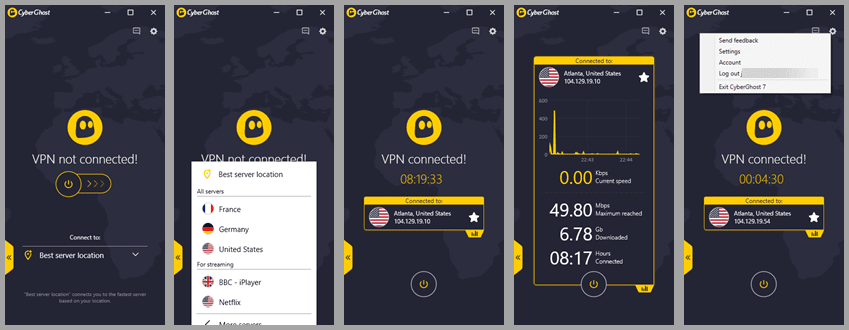
- Connecting to the “Best sever location” illustrates some other details: (4) connection message, (5) power switch, and best server selection (6). To make a quick connection, select your server by clicking on the down arrow. This displays the best or last used server followed by various favorites. Next, toggle the power switch on. This completes your VPN server connection.
- Clicking on the tab at the bottom of the Connected to” box will allow you to see statistics for the connection. These include “current speed (kbps)”, “maximum reached (kbps)”, “downloaded amount (Gb)”, and time connected (hours:min).
- Finally, the client menu (3) will let you send feedback, change settings, view account info, log out of current account, and exit the CyberGhost VPN software.
 The above images are of the unexpanded dashboard. We can see the expanded dashboard by clicking on the tab on its bottom left-hand side.
 Before we look at the many ways that you can choose a server to connect to, let us first look at some of the features, rules, and settings for the software.
CyberGhost VPN App Features, Rules, and Settings
Connection Features
Turning on these features will provide extra privacy and security layers for your CyberGhost VPN service. These features include the following:
- Ad Blocking – will allow your web pages to load quicker, be less cluttered, and easier to read.
- Block malicious websites – will help protect you while surfing the Web by detecting and blocking potentially dangerous websites.
- Block online tracking – keeps trackers from watching your Internet habits and developing an online profile for you. This will increase your Internet privacy.
- Automated HTTPS redirect – This can provide you with better privacy and security by forcing URLs to use HTTPS connections if available. This provides you end-to-end encryption while using the CyberGhost VPN service.
- Data compression – should be left off unless you are using a mobile connection which charges for data like a cellular network.
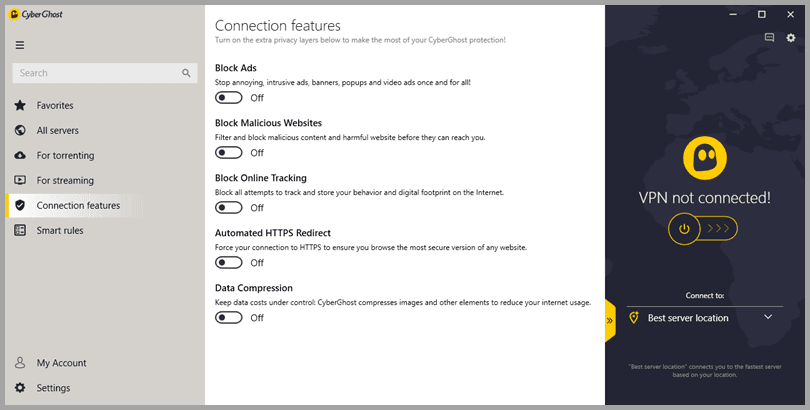 By default, all connection features are off. You should toggle all but data compression on for maximum CyberGhost privacy and security protection.
Smart Rules
Smart rules allow you to setup triggers to take full control of you online privacy while using the CyberGhost VPN network. These are divided into three main types of rules: Startup, Wi-Fi protection, and Exceptions.
Smart Rules: Startup
Startup rules let you choose how and when the software opens. These include the following
- AutoStart – starts the CyberGhost client when Windows starts to ensure that you are always secured when using your computer or tablet.
- Auto-connect – will automatically connect you to your last known location when the client software opens.
- Auto launch app – when the you connect to a CyberGhost VPN server. This is usually your default browser in incognito mode for best privacy.
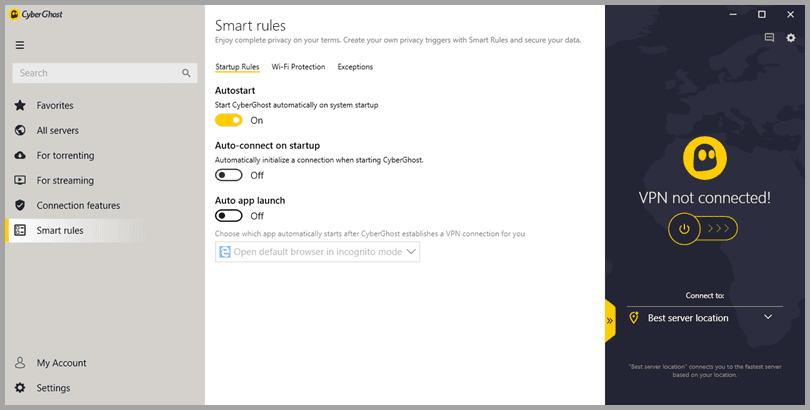 By default, only autostart is set. Setting all of these can help ensure that you are always protected while surfing online. They will work in conjunction with the automatic “kill switch” which is enable by default to provide you with nearly continuous protection.
Smart Rules: Wi-Fi Protection for Hotspots
Once CyberGhost is running, it can detect any changes in the WiFi networks around you. These rules allow you to specify the way CyberGhost will respond to these changes. You can define actions for the following categories of WiFi networks:
- New encrypted Wi-Fi – refers to new networks that are password protected.
- New open Wi-Fi – refers to new networks with no protection.
- Known Wi-Fi networks – include networks that you have connected to before.
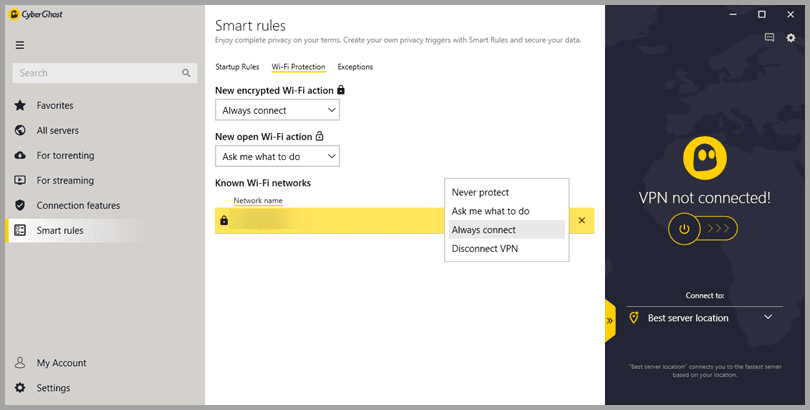 The options for each type of Wi-Fi network are the same: Never protect, Ask me what to do, Always connect, and Disconnect VPN. We always prefer to have it ask us what to do so that. This provides us a notification when a Wi-Fi network changes and what type of network it is. This is the default for all Wi-Fi hotspots. You could always set them to always connect to be safe and then disconnect later if you want. You should never default to never protect in our opinion.
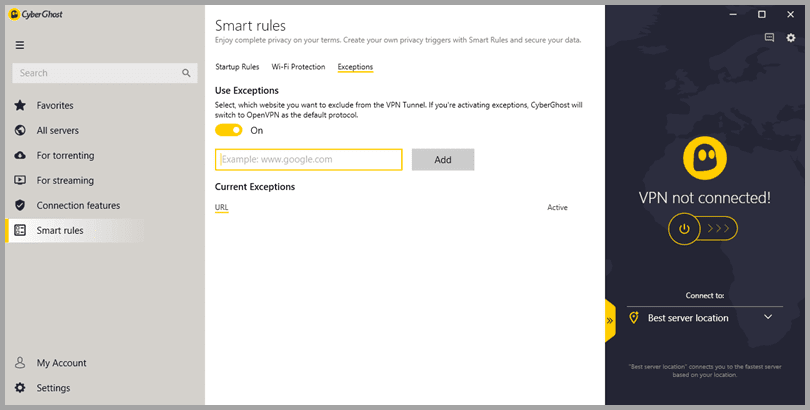
Smart Rules: Website Exceptions
The last smart rule allows you exclude websites from the VPN tunnel. By default, exceptions are disabled. You create an exclusion by entering website URL and adding it to exclusion list. Once you have added a website to the list you can toggle its active state (on-exclude, off do not exclude). You can also delete it from the exclusion list. Exceptions only work with the OpenVPN protocol so the app will default to it if exceptions are enabled.
 Settings
 Settings
Their are two types of settings in the CyberGhost Windows client: General and Connection.
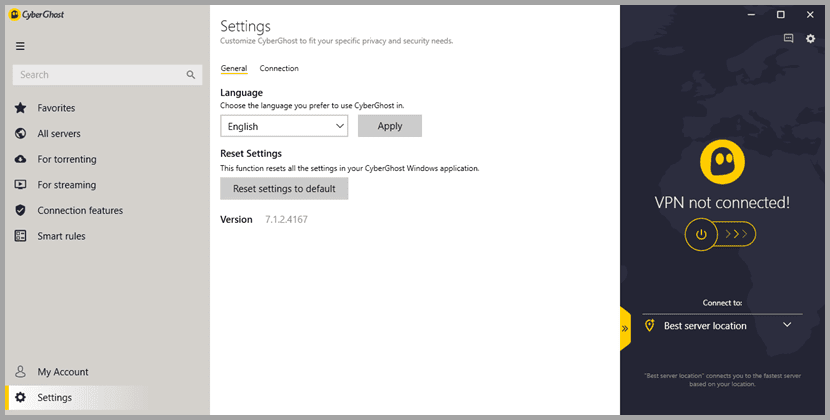
Settings: General
The are two general preferences that you can set to control the CyberGhost software. They are the following:
- Language – lets you choose the language that the Windows software uses. You can choose between English, German, French, Italian, Spanish, Romanian, Polish, Russian, and Portuguese. Since you have to restart the client to change languages, clicking on “Apply” restarts the software.
- Reset Settings – changes all the settings in the CyberGhost app back to their installation defaults. This includes those in Connection features, Smart rules, and Settings.
Settings: Connection
Connection settings are primarily concerned with the VPN protocol used or guarding against DNS leaks. Connection settings associated with securing your data include the following:
- VPN protocol – lets you choose the VPN protocol that you want to connect to the CyberGhost service with. You can select between the following secure protocols for Windows: OpenVPN, IKEv2, and L2TP L2TP and IKEv2 are native Windows programs and provided by Microsoft, while OpenVPN is a free software (under GNU GPL) and is provided by OpenVPN Technologies, Inc. The default is ‘Automatic selection’ and the client will defaults to IKEv2 (starting with Windows 7). In case no successful connection can be established the client will switch to OpenVPN. L2TP provides another secure option if you are having connection problems. PPTP is no longer included as a choice because it can no longer be considered as safe.
- Use TCP instead of UDP – for connections (OpenVPN only). By default CyberGhost uses UDP for its connections. UDP is faster due to limited data error checking. The downside is that downloads can be suddenly interrupted or corrupted and packages can get lost e.g. when playing online games. TCP provides more stable connections due to increased error checking. However, this stability comes at the expense of speed.
- Use a random port – to connect (OpenVPN only): This option allows CyberGhost to establish its connections through a randomly chosen port. This port is changed with each new connection. This makes it harder instead of a fixed port that makes it easy for content providers to slow down or block CyberGhost connections. The port range can be changed at anytime if needed and all ports are secured internally by Firewall rules.
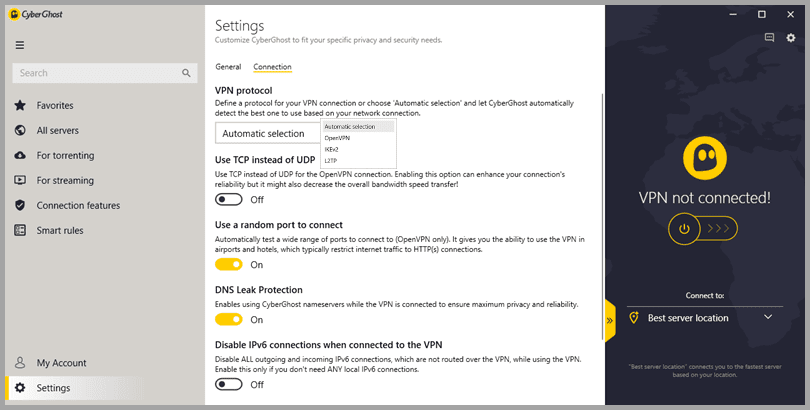
- DNS leak protection – activates IPv4 leak protection by using internal CyberGhost DNS servers instead those of your Internet provider. This also helps guard against censorship or other Internet manipulation.
- Disable IPv6 connections – when connected to the VPN service. This guards against data leaks from IPv6 traffic running outside the CyberGhost VPN tunnel. Activate this option when using a browser that is vulnerable to WebRTC leaks. It blocks all IPv6 traffic and allows only IPv4 traffic.
- Repair virtual network card – lets you repair the original CyberGhost software drivers if you experience problems.
My Account Information Screen
The last menu item that we want to look at before we get into using the Windows client to connect to the CyberGhost network is the My account screen. This screen your “Username”, “Email address”, and “Plan information”.
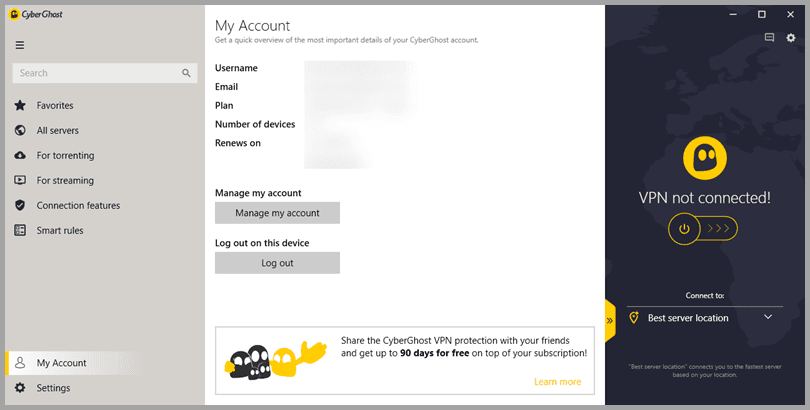 You can also click on the link “Manage my account” to login and make changes to your account on the CyberGhost website. Finally, you can log out of your account from here but will have to re-enter your authentication credentials (“Username” and “Password”) if your do.
Connecting to the CyberGhost Network
Their are many different ways that you can choose a VPN server to connect to the CyberGhost VPN service. The fastest and easiest of these is by selecting a favorite and connecting to it. You can also connect by country or local server. Finally, you can select a server optimized for a particular VPN purpose.
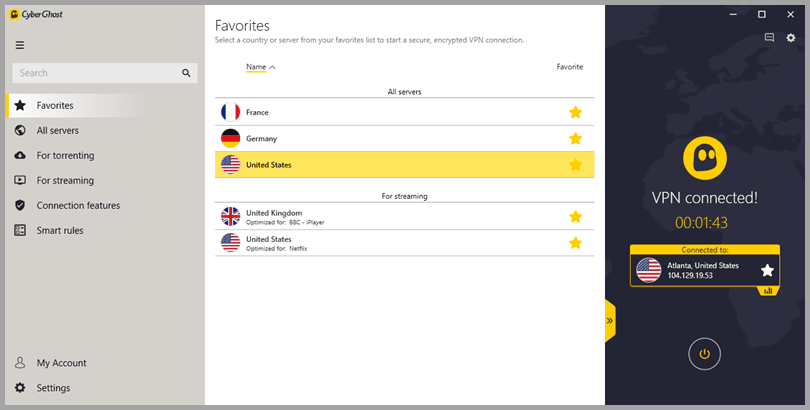
Connecting to a Favorite VPN Location
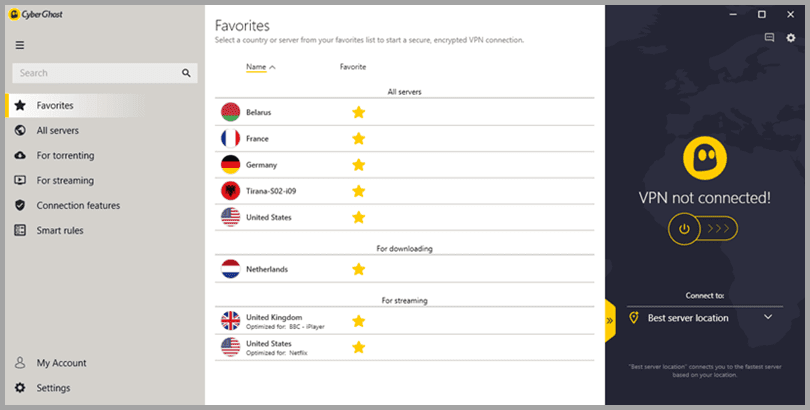
The favorites tab provides a quick and easy way to keep up with useful VPN sever connections. Favorites are shown by a yellow star beside the country location or server name. The favorites shown are the default ones installed by the app.
One way that you can connect to a favorite location is to first disconnect from your current server. Then, select a new favorite location by clicking on it. Finally, toggle the switch “On” to complete the new connection.
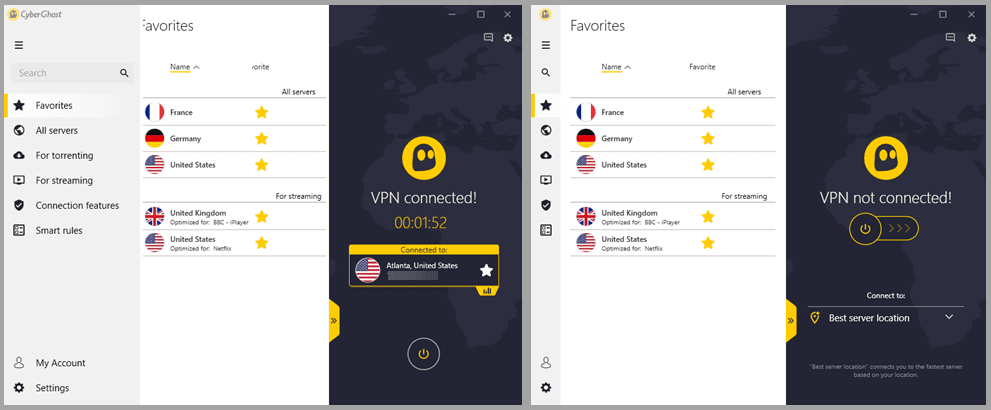 However, Cyberghost has made it even easier to select a VPN server or change to a new one. Simply double click on the favorite location you want to use. If you select a country location like the United States, the software will connect you to the best one in that country from your location as was done here. Notice, that the server selected is not a favorite itself as indicated by the white star beside its name in the “Connected to” box.
 The most generic way that you can connect to a CyberGhost VPN server is by using the “All servers” tab.
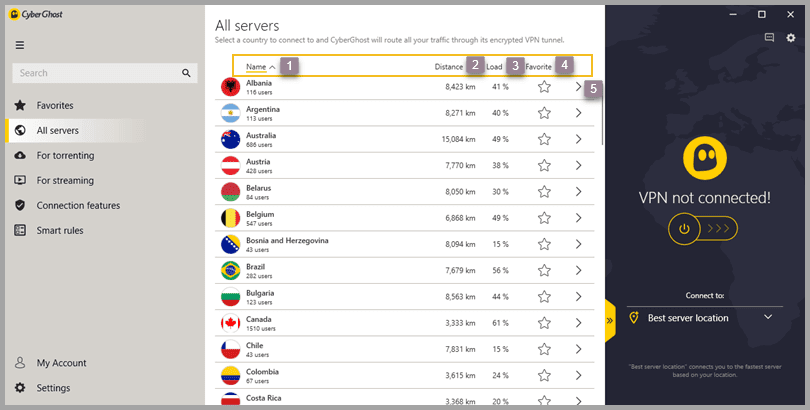
Connecting Using All VPN Servers
When you connect using the “All servers” tab, you can choose to connect to a particular country or a local server at a specific location. Let us look at how to do this now. First you order the country list by: (1) “Name”, (2) “Distance”, (3) “Load (%)”, or (4) “Favorite”. The locations are listed alphabetically by country name by default. The number of current users is also shown for each location.
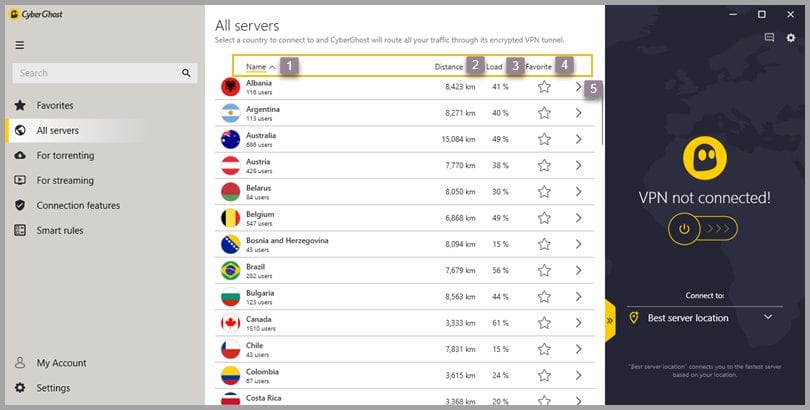 Favorites are chosen by clicking on the white star across from its name. This will turn the star yellow. Selecting the “>” to the right of a country will expand it into a list of its local servers. Selecting the “>” at (5) expands Albania to its list of the local servers for Albania.
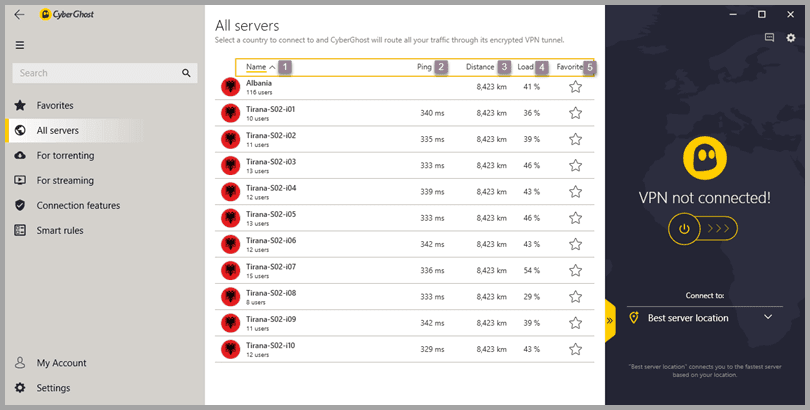
This list can be ordered by: (1) “Name”, (2) “Ping, (3) “Distance”, (4) “Load (%)”, or (5) “Favorite”. Clicking on the ping column will recalculate the ping values (ms). The name now contains a list of local Albanian servers in Tirana. Selecting a server with a low combination of ping and load values should provide a fast server at that location.
 Now let us favorite the “Tirana-S02-i09” sever and then double click on its name to connect to it. That’s all it takes to connect to a local server.
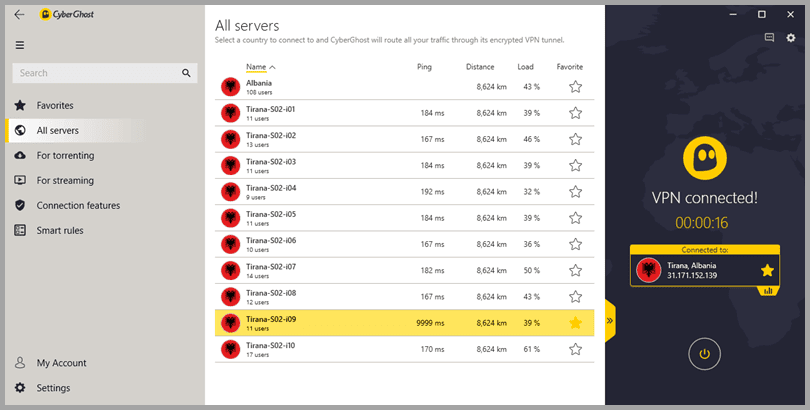 The software automatically copies the local server in location and initiates the connection. After a short time the connection completes. Also notice that the local server has become a favorite as denoted by the yellow star beside its name in the “Connected to” box.
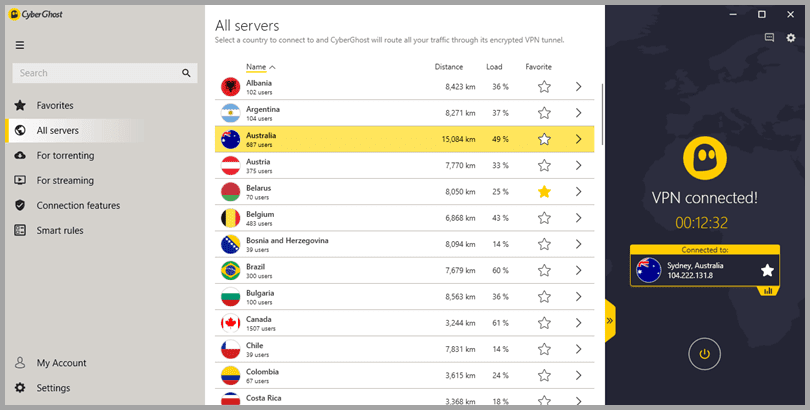
Now let us connect to the best Australian server from our location. Select all servers or the back arrow to compress the local servers. This time, select Belarus as a favorite. Then double-click on the Australian location. The software will automatically select a fast server there and complete our connection.
 You can see that using the “All server” list lets you choose the granularity of your VPN server connection. You can select a server at the country level or a specific local server in that country. Finally, you can select a server that is optimized by VPN purpose.
Connecting to an Server Optimized by VPN Purpose
The CyberGhost client allows you to connect to optimized servers for two different purposes. You can select a country for torrenting files or one for streaming media from a content provider like US-Netflix, UK-BBC iPlayer, Germany-Zattoo, and others.
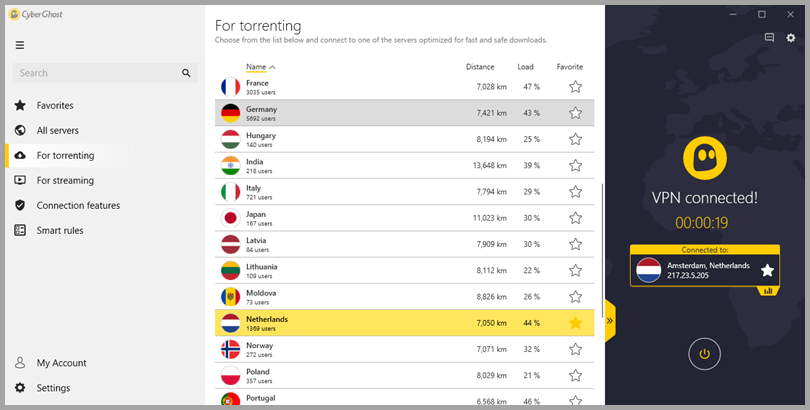
Selecting a CyberGhost VPN Server to Torrent
All that is necessary to connect to a server optimized for Torrents is to select the “For Torerenting” list. Then choose a location to torrent through. Finally, double-click on its name as we did for the Netherlands in this case. In a short time the, you will be connected to a fast server in your chosen location that permits torrents. Go ahead and select the Netherlands as a favorite location to torrent as well.
Selecting a CyberGhost VPN Server for Media Streaming
Selecting the right server to optimize a content library for streaming media involves choosing both a location for the library and a content provider. An example of this is US-Netflix or German-Netflix.
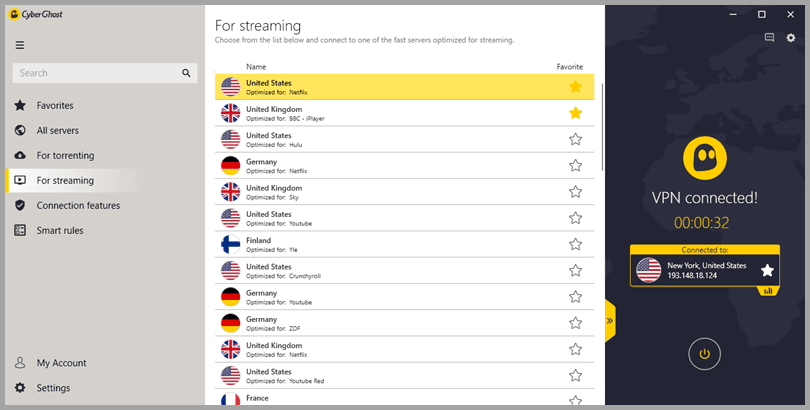 First, select the “For streaming” server list. Then, choose location-content provider. Double click on your choice to complete your connection to a server that has been optimized for your selected content. In this example, we chose a server optimized for US-Netflix.
Before we take a look at running the client from the system tray, let us take a final look at our “Favorites” to see how the favorites that we added are displayed. In addition to the default “All servers”, we now have Belarus and Tirana-S02-i09 favorites. This illustrates that favorites can be both country locations or local servers. Also there is now a new category for downloading which has our Netherlands torrent favorite. Finally, our steaming favorites remain unchanged.
 Adding favorites for sites that you use a lot can make it easy to use the app from the system tray. Taking advantage of the quick connections that the allow make connects from the system tray easier while freeing up desktop space.
Running the CyberGhost Windows Client from the System Tray
If you want to minimize the desktop space used by the CyberGhost app, you can run it from the system tray. Shrink the client to the system tray by clicking on the “x” in the client control area at the top of the dashboard. The client will be displayed by the following icon which indicated that the VPN is not connected.
 Clicking on this opens the dashboard temporarily. This allows you to open the quick-connect locations by clicking on the down arrow. Select either the best server or a favorite that you use regularly like Belarus in this example. Finally, toggle the connection “On”.
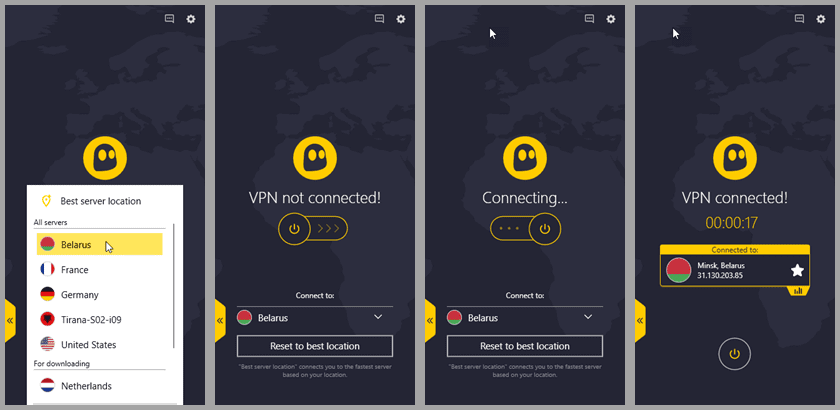 After the connection completes and the CyberGhost client loses focus, it will shrink back to the system tray. You can check this by examining its “Connected” icon.
 Right-clicking on the system tray icon will let you exit the CyberGhost VPN Windows client.