 You can download the Private Internet Access iOS app directly from the iTunes App Store or start at their site. To start on the PIA site, click on “Support” at the top of the site and then “Client Download and Support”. The client setup page also has manual setup guides to configure iPhone and iPad to use their service with OpenVPN, L2TP/IPsec + PSK, and if you have to PPTP. Once you get on this page, click on the “Download” button in the iOS App box (shown at left). This will take you to Apple iTunes where you can download and install the app to your iOS device. The app requires iOS 7.0 or newer.
After installation, you will need to enter your “Username” and “Password” that you obtained in the welcoming email from PIA and sign in before using their service. Once you have finished logging in you will see a screen like the first one in the image below. This is the main connection screen for the app. It shows your current connection status, a toggle to change it, your currently chosen region, and your original and virtual IP addresses if you are connected to a VPN Server. In this case you are not connected so the word “Disconnected” and the toggle area are shown in red. “OFF” is printed on the toggle to emphasize this. The IP addresses have been redacted for this review.
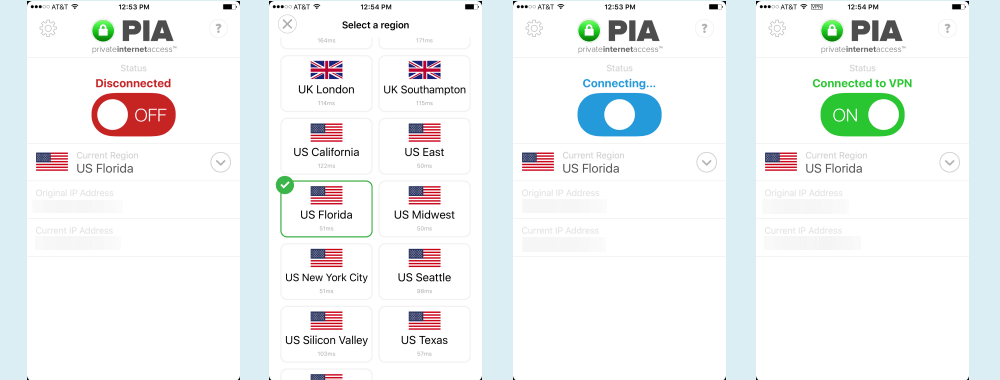 Tapping the down arrow to the right of the current region US Florida will open the locations screen which is the second screenshot above where you can choose the country or region that you want to connect to. These are shown in alphabetical order and have the ping time beneath the location name to help you choose the fastest server from your location. Us Florida is the currently selected location as shown in this image. This is indicated by it being outlined in green and having a check in its upper left corner. Tapping the status slider in the first image will start your connection to Florida. The third and forth screenshots above illustrate the connection process. The last screenshot shows the connection once it is complete. Notice the status says “Connected to VPN” and it and the slider area are green with the word “ON” in white. This screen also shows you your new virtual IP address assigned by the VPN server.
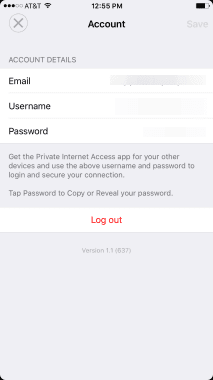
Clicking on the “gear” icon at the top left of the screen will bring up a screen similar to the one below where you can examine your account information and logout. If you logout from the app, you will have to re-enter your username and password the next time you use it.
The iOS app uses the IKEv2 VPN protocol instead of OpenVPN. This protocol is considered as secure as OpenVPN and has the advantage of MOBIKE. It is ideal for mobile devices like the iPhone and iPad because it will try and reconnect if the session drops and is good for multi-homed devices. It will allow you to switch between your home network to cellular and maintain you current VPN session.
The PIA iOS app is simple to use. Just choose a location and then tap the status toggle to complete your connection. To disconnect, tap the status toggle once more. It is as simple as that so everyone should be able to use it as it requires a minimal amount of technical knowledge to install or use. It does not have any of the more granular settings found in their other custom software so more technical users might be a little disappointed.