 Before you can get access to download the ExpressVPN software, you must first subscribe to their service. This is a multi-step process:
- Choose the ExpressVPN plan that suits your needs.
- Enter the email address you want to use for your account.
- Choose your payment method and complete your purchase.
- Make a password for your account.
You will then receive a welcoming email from the ExpressVPN team with a link to set up the service on your device.
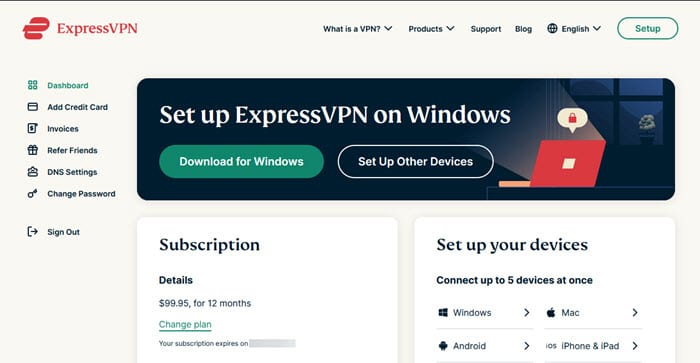
You can also log into your account on their website. To sign in, click on “My account” in the main website menu. Then enter your account email and password. This will open your account dashboard. All of your account details can be accessed and managed from here.
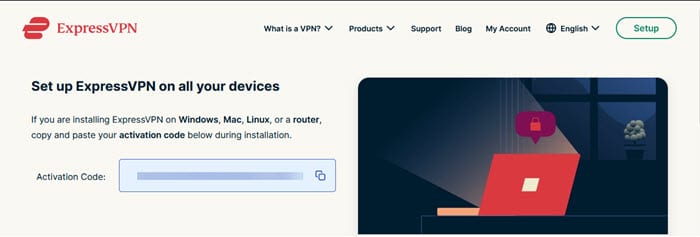
Clicking on the green “Set up ExperessVPN” will open the download page where you can choose the device that you want to install the ExpressVPN software on. After you select your device, the right-hand side of the screen will display the “Download” button to install it for desktop applications. Also, you will need to copy the activation code to install ExpressVPN on Windows, Mac OS X, and Linux. For iOS, Android, and Kindle Fire devices this will display the button to the app link on its respective store (iTunes, Google Play, and Amazon).
This page also has links to install the extensions for Apple Safari (Mac), Google Chrome (Windows, Mac, Linux), and Mozilla Firefox (Windows, Mac, Linux). You must have the respective browser and the desktop version of ExpressVPN installed on your device to use these. They are not stand-alone VPN applications. They are just easy ways to control the main desktop apps.
There are also instructions and DNS server IP addresses for using the MediaStreamer service with Apple TV, PlayStation, Xbox, other devices you want to use it on. Instructions for installing ExpressVPN on a number of routers can also be found here. Lastly it has instructions and credentials for manually installing OpenVPN, L2TP/IPsec or PPTP on your devices.
Installing and Using the ExpressVPN Windows Client
ExpressVPN Windows Client Installation
First, download the Windows installation file to your PC, laptop, or tablet as shown above. Next, run it as admin to begin the installation process. You may have to allow it to make changes to your machine. Afterwards, you will see the welcoming screen. Click on “Options” if you want to modify the directory where the software is stored.
Else, select “Install” to begin the process of adding the Windows client to your computer. After a short while, you will get a message saying that the installation has successfully completed. Close this and the ExpressVPN client activation window will open.
Activating the ExpressVPN Windows Client
To activate the client, paste the activation code that you copied from the download screen into the input box. This will activate the “OK” button. You can also choose to launch ExpressVPN when you start Windows and if whether or not you want to share aggregate data with their support team. After you enter your code and make your other choices, click “OK” to finish setting up the client.
Opening the ExpressVPN Client for the First Time
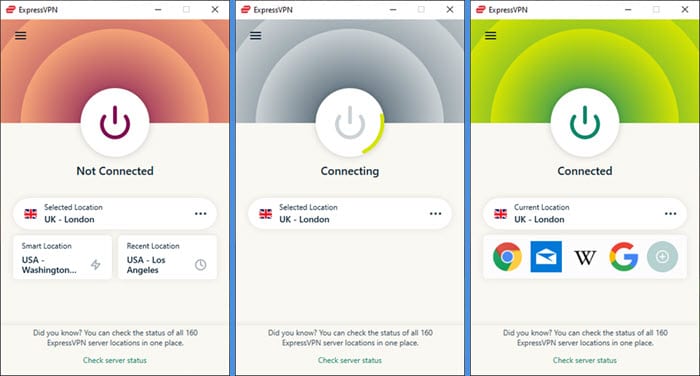
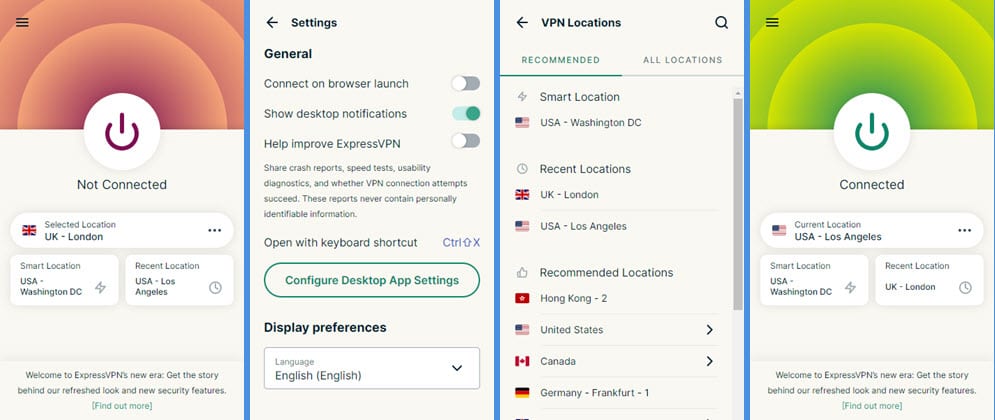
Once the client has been setup, it will open for the first time. The main dashboard window will be shown with a prompt to connect to the service. Clicking on the switch starts the connection process to the smart location, USA-Washington DC in or case. We will discuss how the app determines the smart location later in our ExpressVPN review. You will see a prompt showing that you are connected and your Internet is secured. This is just an introductory tutorial to your first connection to the ExpressVPN network.
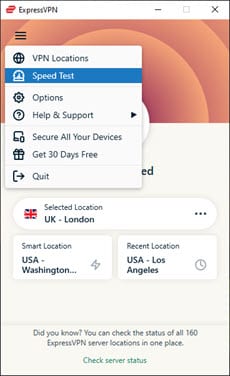
Before we get into a more thorough look at connecting to different locations using the app, let us first take a look at the client menu. This menu is opened by clicking on the menu (three horizontal lines) icon in the upper right of the dashboard.
ExpressVPN Client Menu
Before opening the menu to make changes, you need to disconnect from your current server. Here is an exploded view of the main ExpressVPN Windows client menu. We will explain more about these menu items: “VPN Locations”, “Speed test”, “Help”, and “Options” later in this ExpressVPN review.
- Diagnostics – allows you to examine your connection process in notepad or save it to a file.
- Get 30 free days – opens the ExpressVPN website page where you can invite friends to try their service. If they purchase it, you both get 30 free days of service.
- Quit ExpressVPN – closes the client but retains your activation code so that you will not have to reenter it.
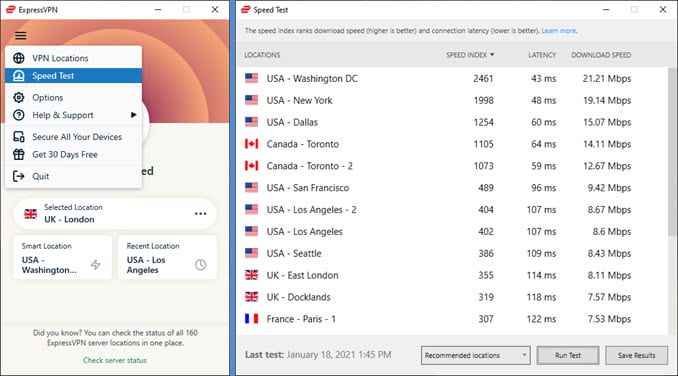
ExpressVPN Speed Test
Selecting the “Speed test” will open the Window that will let you run a speed test on all of the servers on the network to see which is best for your purpose. Your last test data will be displayed when you open it. You must be disconnected from the VPN to run a new speed test. When you run a new speed test, the dashboard will show the “Speed test running…” message and the stats will show pending until they are recalculated.
The columns of the speed test table are as follows:
- Location – displays a list of the connection sites for the network. You can click on the “Location” heading to organize them in alphabetical order.
- Speed index – A combination of the “Latency” and “Download speed”. It gives you a single number to evaluate the speed of a location. Higher numbers mean faster speeds.
- Latency – Measures the time in milliseconds that data needs to physically travel from your computer to the VPN location. Low numbers mean faster response for your Internet traffic.
- Download speed – Measures the amount of data per second that can travel through your Internet connection to that VPN location. Higher numbers usually mean faster downloads.
Speed Test Guidelines for Choosing a Location
So, how do you use the speed test to determine the best location for your connection? Here are a few general guidelines:
- Overall fastest location – This will generally be the one with the highest speed index number.
- For general surfing – In practice, you should take a few (2 or 3) locations with the highest speed index numbers and test them to see which is best for you.
- Fastest for a particular country – First click on the location column to alphabetize the list of countries. Next, scroll to the your chosen country and find the location in that country with the highest speed index number. If two are close, you should test both to see which is best for your connection.
You can click on the star to the right of the locations to favorite them. This will make it easy to find the one you want to test after you close the speed test. The star turns yellow which indicates it is now a favorite. We have chosen to favorite USA-Atlanta, USA-New Jersey-3, and Canada-Toronto based on this speed test to see which provides the best performance.
Help Menu
Below is the expanded “Help” menu. The menu items include the following:
- Support website – Selecting this will open the support page on the ExpressVPN website so that you can troubleshoot an issue, examine their FAQ or view a device installation guide.
- Contact us – This opens a ticket window where you can describe your problem and include diagnostics if you are having connection errors. You can then send the ticket to ExpressVPN support. They will reply back to you via the email address on file for your account.
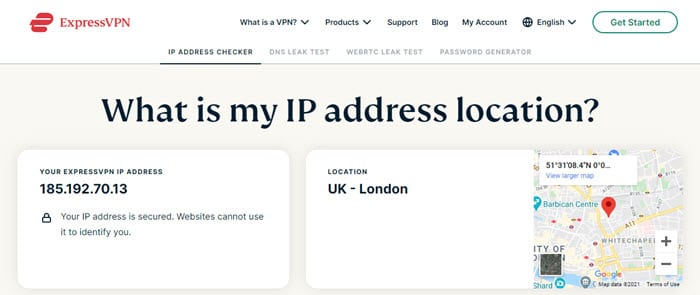
- IP address checker – This is an IP address checker on their website. It correctly showed our Washington DC location. We also tested this server location and others with some other IP checkers to verify the results.
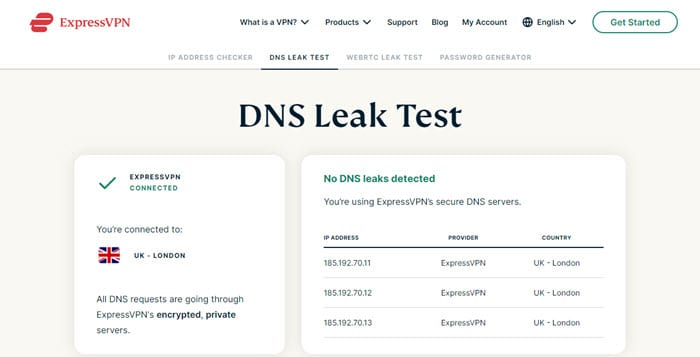
- DNS leak test – All DNS queries are going through the ExpressVPN encrypted private zero-knowledge DNS servers as indicated by this test. Third party leak test also indicated this and showed that no leaks were detected.
- About ExpressVPN – Displays the ExpressVPN Windows client version information for your current installation. Since desktop apps do not auto-update, this can help you keep up-to-date with the latest version. The old version must be removed before the new one is installed.
ExpressVPN Client Connection Options
The Options menu consists of the following tabs: General, Protocol, Account, Browsers, and Advanced. These allow you change the clients connection behavior.
ExpressVPN General Options
The general options are divided into three categories:
- Startup – Setting these and Network lock will ensure that you are protected.
- Automatically start the ExpressVPN service when Windows opens.
- Connect to the last known connection when the client is launched.
- Network lock – This feature is also referred to as VPN kill switch.
- Leave this set to ensure that the Internet connection is killed if the VPN connection is accidentally dropped
- You should know that this lock is not active if the VPN is not connected. It is also not active if the service is in the process of connecting or disconnecting.
- This means you should stop running other apps when changing servers to avoid leaks.
- Alternately, you can allow access of LAN (Local Area Network) resources like printers.
- Leave this set to ensure that the Internet connection is killed if the VPN connection is accidentally dropped
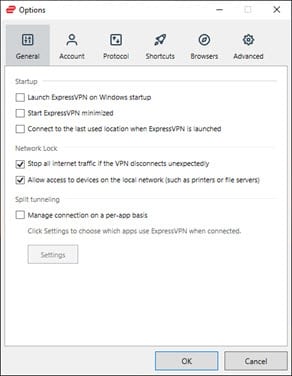
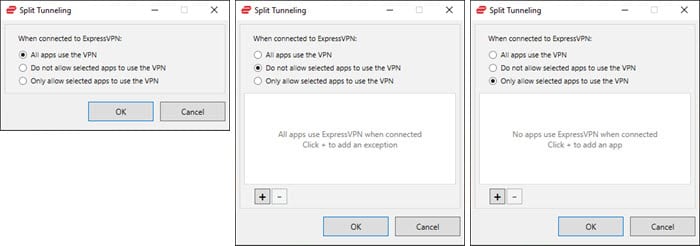
- Connection per app – you can enable split-tunneling to decide which apps will be tunneled using the ExpressVPN service.
- Toggling this on enables the “Settings” button so you can manage your apps. It has three options.
- Tunnel all apps – this is the default and the only one that preserves your privacy and anonymity. All apps are encrypted and Tunneled through ExpressVPN.
- Chooses apps not to tunnel – you can add and remove apps that you want to use your regular ISP with here. All other apps will be encrypted and tunneled.
- Choose apps to tunnel – this lets you add remove only the apps you want to encrypt and tunnel. All other apps will use your regular ISP and will not be encrypted.
- Toggling this on enables the “Settings” button so you can manage your apps. It has three options.
ExpressVPN Protocol Selection
You can select the protocol that you use to connect to the ExpressVPN network here. You should know that not all locations will be available for protocols other than OpenVPN. These are the protocols that you can choose between:
- Automatic – you should use this protocol in most cases. It allows the service to select the best protocol for your network. Most of the time this means that it will use OpenVPN(UDP). However, it also allows the service to choose stealth options for network users in areas where censorship is present like China. It can also automatically change protocols to overcome other network issues like weak signals or unstable connections.
- Lightway – this is the latest protocol from ExpressVPN. It is optimized for speed, security, and stability.
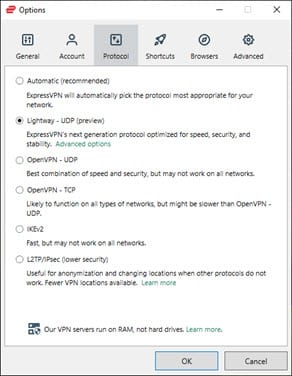
- OpenVPN (UDP) – this is the default protocol in many apps because it provides a good combination of speed and security.
- OpenVPN (TCP) – you should use this protocol if you experience network stability issues because unlike (UDP), it does error checking on data packets. This improves the connection stability because it resends dropped data packets but it is slower.
- IKEv2 – this protocol is fast but may have issues on some networks. We would receommend it more for the mobile app.
- L2TP/IPsec – a combined protocol which is more secure than PPTP but slower. It is considered secure but is sometimes blocked by firewalls due to its use of UDP Port 500.
ExpressVPN Account
This tab contains a link to the get 30 days free service page that we discussed earlier in the client menu section of our ExpressVPN review. It also displays the number of days remaining in your current subscription. Finally, it lets you sign out of the Windows client. Be aware, if you sign out of the app, you will have to reenter your activation code the next time you launch it. This secures your service account if you are using a shared computer to run it.
ExpressVPN Browser Extensions
Use this tab to download the ExpressVPN extension for your browser. They have extentions for Google Chrome and Mozilla Foxfire. The client detects if you have installed the browser before it offers to let you add the extension.
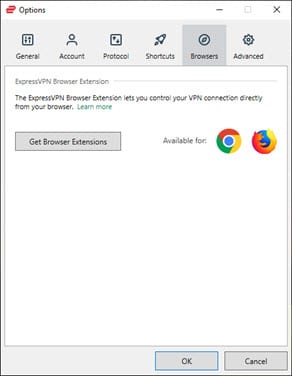
Installing the extension will allow you to control the VPN service from within your browser. Note that it is not a stand-alone application and is useless without the desktop client. With that said we strongly recommend using the extension along with the client.
Adding and Using the ExpressVPN Chrome Extension
First, click on the “Get Chrome” button to install Google Chrome on your machine. Then, select “Get extension” to add the ExpressVPN extension to it. Choose “Quick install” and review the permissions for the extension. If these are acceptable, click on the “Add extension” button to complete the process. Once added you will see the ExpressVPN icon to the right of the URL box in your browser. Click on this to manage your VPN service.
Here are some images of the startup and privacy settings for the ExpressVPN browser extension. It also displays the process used to connect to the “Los Angeles” location. This process is as follows:
- Click on the “…” beside the selected location.
- Select the “USA – Los Angeles ” as an example.
This will connect you and open the main dashboard. If you open the Windows client, you will see that it also shows you connected to “Los Angeles”
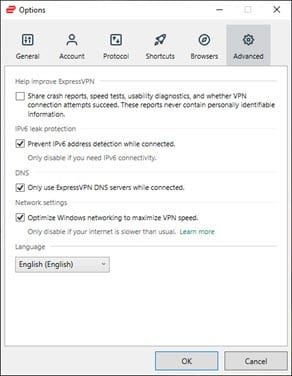
ExpressVPN Advanced Options
The last tab has three toggle settings.
- Share information – optionally share aggregated, non-personal crash information with EXpressVPN.
- IPv6 leak protection – disable IPv6 detection should be enabled.
- Use ExpressVPN DNS – Enable this to ensure that your DNS queries will be protected by their zero-knowledge DNS servers.
- Network settings – this will optimize your Windows networking for faster performance.
Using the ExpressVPN Windows Client
You can see that the main client is still connected to the Canada, Toronto-2 location that we selected using the ExpressVPN Google Chrome browser extension. Before you can change locations, you need to disconnect from the network by toggling the connection switch. The dashboard will then display the “Smart location” and “Choose location” buttons.
Choosing a New Network Location
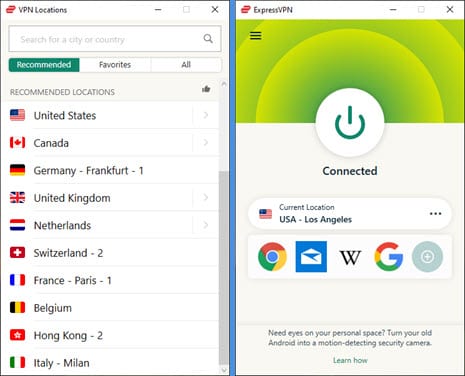
You can use the menu “VPN locations” item to choose a specific location to connect to. However, it is easier to just click “…” next to the currently chosen location. This will open the recommended list of locations. You can see that the United States is a favorite country. This list displays about ten recommended countries to connect to from your current location. The countries with a right pointing arrow in front of them can be expanded into specific cities by clicking on the arrow. The Netherlands example illustrates this. Only one country can be expanded at a time.
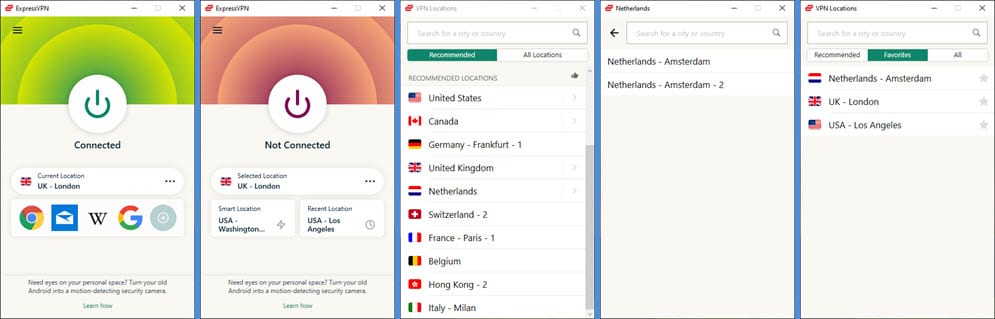
The “All” tab lists all of the locations. We have expanded the Europe continent and the Netherlands country marked Amsterdam as a favorite. You can scroll to any country or city with this list. However if you are looking for a particular country or city, using the responsive search will make your task easier.
The last list shows your favorite locations. Notice this list now shows Amsterdam, London, and Los Angeles. Marking your favorite server locations makes them easier to access in the future.
Connecting to a Specific Server Location
Now that we have looked at how to select a new location, let us connect to one. Clicking on the USA-Atlanta will select it. Notice the dashboard now shows it as the selected location. To begin the connection process, you could toggle the dashboard power switch. However, it is easier to just double-click the location that you want to connect to. Disconnecting takes just a single toggle of the dashboard switch.
As you can see, the ExpressVPN Windows client is easy to install. Its default settings are good for most users. This means that those with limited technical knowledge can use it to connect to the ExpressVPN service. It has some advanced features like a kill switch, DNS leak protection, and split-tunneling that those with more technical expertise will appreciate. Connecting to the smart location, which is the reliable VPN location from you takes just a single click. You can control it through the browser extension. You can choose a specific country or city to connect to with just a few clicks. Disconnecting from the ExpressVPN network takes just a single click. Nothing could be easier.
