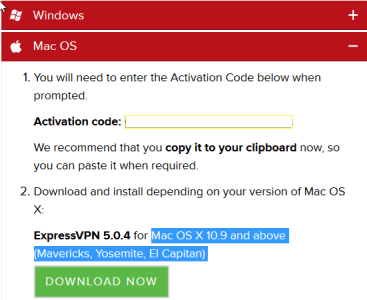
Those whose operating system of choice is Mac OS X have not been left out by the technical staff at ExpressVPN. They have created a client to make it easy for you to connect to VPN servers in their network as well. Similar to the Windows client, you must first sign up for service and then login to your account page on their website to download the ExpressVPN Mac setup file. You will want to go to the subscription tab of your account and click on the green “set up ExpressVPN” button. This will take you to the licenses page where you can download the setup file for the latest client for Mac OS X 10.9 and above (Mavericks, Yosemite, El Capitan).
Next you will want to click on the green “download now” button to download the setup file for the Mac client to your computer. Before doing this, select the activation code in the yellow box and use Command + C to copy it so that you can paste it in to the client in a moment to activate its license for your account. You can use the registration code on multiple computers. Just make sure to have the code handy as you will need to enter it the first time you launch the client on each Mac device.
Once the setup file is on your computer, you will need to run it to install the Mac client. This will install an icon to launch the ExpressVPN app on your Launchpad like that shown in the image on the left below. When you launch the Mac client for the first time, you will have to activate it by pasting in the activation code that we previously copied. The second image below shows this activation screen. Select the box above “launch ExpressVPN on startup” and hit Command + V to paste in the code. Once the code has been pasted in, click on the grey ok button to activate the client. The last screen shows that we have successfully activated the software license and can now start using the app.

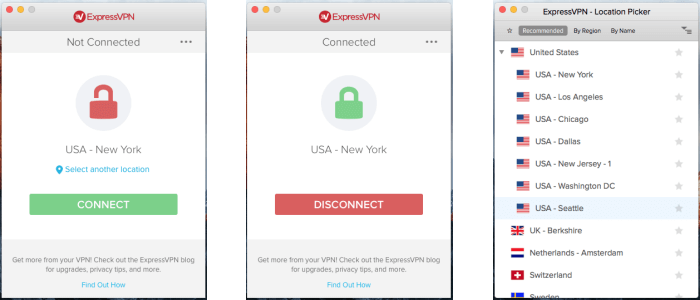
Pressing the “start using app” button will bring up a screen like the one on the left below. This is the not connected state for the client. It is easily recognized by the big red unlocked lock. It also shows the last location that we connected to which makes it easy to reconnect there. Pressing the green “connect” button will connect us to USA – New York in our case. The connected screen in the middle image shows this connection. In addition to displaying “connected”, it has an image of a green lock in its locked state. This indicates that our connection is now secure and that we are connected to a VPN server in New York. Pressing the red ‘disconnect” button will close our connection. The last image shows the location picker screen which can be accessed by clicking on the “select another location” link from the screen on the left below. Alternately you can click on the ellipsis button “…” in the upper right of either of the first two screens and select the location picker from list the list that appears.
The location picker screen shown on the right above has four menu items for creating and ordering the locations that you can choose from:
- Favorites or “star” – This shows two different list.
- Recent Connected – This is a list of the three most recent connections ordered from newest to oldest.
- Favorites – This is a list of your favorite connections in alphabetical order.
- Favorites are selected by clicking on the grey star to the right of the location on any menu list. (The star will turn yellow indicating that it is a favorite location)
- Favorites can be selected at either the country or city level. Favoring a city will always connect you to that city while a country will connect you to the best server location in that country at the current time.
- Favorites can be deselected by clicking on the yellow star of the location you want to remove.
- Recommended – List of ExpressVPN’s top picks for you.
- By region – Tihs displays regional lists that you can choose from including the Americas, Europe, Africa, Middle East & India, and Asia Pacific.
- By Name – This shows a list of all of the locations in alphabetical order.
Individual countries or regions can be expanded or contracted by clicking on the triangle shapes to the left of them. A full list can be extracted/compacted by clicking on the expand/contract icon (downward triangle with horizontal lines) in the upper right of the location picker screen.
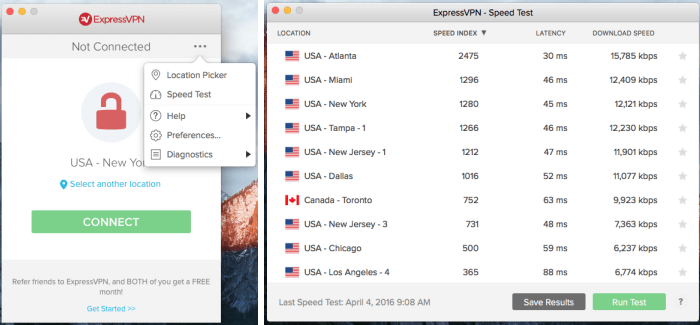
As the screenshot below shows, the dropdown list obtained by clicking on the ellipsis has other options available besides the location picker. The second one is the speed test. The speed test screen is shown on the right below. This screen will help you determine the fastest connection for your current purpose. It measures a couple of different variables:
- Latency – The amount of time it takes for data to move from your computer to the VPN server location (milliseconds).
- Lower latency is best and as a general rule the farther away a server location is, the higher the latency.
- Download speed – A measure of the data transferred per second (kb/s)
- Higher download speed is better.
Using these measurements and some “black-box” calculations, ExpressVPN determines a Speed index which is a number which represents how fast your connection to that location will be right now. Higher speed indexes represent faster connections. The table can be sorted by any column heading by clicking on it. For example, clicking on the location column heading will order it alphabetically. This is useful to easily find the fastest server in a particular country. You can run a speed test and save the results for future comparisons. Clicking on the “?” at the bottom of the test will give you hints on how to find the fastest sever for your purpose. The help option will allow you to send a support ticket or provide a link to the ExpressVPN support page. The diagnostics option will allow you to view or save connection commands to help solve connection problems.
The final option that we want to examine is the preferences which opens a preferences screen with three tabs: general, protocols, and advanced. The general tab is shown in the image below on the left. This will let you choose to auto-launch the ExpressVPN client on startup and connect to the last location when the client is started. You can also buy new subscriptions and switch between them by entering a different activation code (this is equivalent to changing the user). Finally, you can refer friends to earn a free month of service from ExpressVPN.
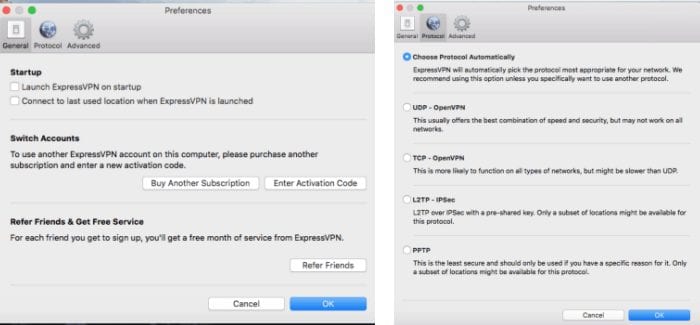
The second tab of the preferences screen is the protocols tab and as shown in the image above. The protocols that you can choose from include the following:
- Choose protocol automatically – This will let ExpressVPN choose the best protocol for your connection
- This will usually be the OpenVPN (UDP) protocol.
- UDP-OpenVPN – This provides the best speed and security but may not always work.
- TCP-OpenVPN – This often work if OpenVPN (UDP) does not but it is slower.
- L2TP-IPsec – Another available option that uses a pre-shared key.
- PPTP – The least secure of all the protocols and only good for streaming.
Protocols other than OpenVPN may have a subset of network locations to connect to. Choose protocol automatically is the default and this is the best option for most users and should not be changed unless you have a connection problem.
The last tab of the preferences screen is the advanced tab which is shown below and currently only has one option. This option is whether you wish to share anonymous speed-test data and info about connections to help them make a faster, more reliable network.

The ExpressVPN client for Mac OS X has the same look and fell of their Windows client. It allows Mac users to connect and disconnect from their network with just a couple of mouse clicks. It does not have a kill switch like the Windows client or more advanced options. However, like the Windows client, it does make it easy for Mac users to choose a VPN server, connect to it, disconnect from it, and then reconnect to a new one. It helps ensures your privacy by securing your connection while using the Internet.
